Project 6

Overview
In this project you will implement a FIFO queue as a monitor that can be used to solve the bounded buffer problem. Your queue will have a fixed capacity and will block calling threads when it is full or empty. Bounded buffers are extremely common in Operating Systems. When you write code in Java, Python, C#, etc. it may seem like you have infinite memory. However, infinite memory is just an abstraction that the OS provides. In reality you are limited by the physical hardware the OS is running on. This data structure could be used to build higher level abstractions like a thread pool.
Learning Outcomes
- 1.4 Apply computer science theory and software development fundamentals to produce computing-based solutions.
- 1.5 Use simple shell scripts and system tools to analyze process behavior
- 3.3 Identify the sources of deadlocks, race conditions, memory stomps and data loss
- 3.4 Apply concurrent programming techniques such as threads, event loops, and inter-process communication
Grading Rubric
Make sure and review the class grading rubric so you know how your project will be graded.
Task 1 - Setup
Follow the steps below to get your repository all set up and ready to use. The steps below show you how to use and set up GitHub Codespaces. You are not required to use Codespaces. All the steps below can be completed on Onyx (the CS lab machines) or on your personal machine if you prefer.
Create your repository from the template
The starter repository is a GitHub template, so you make your own copy of it instead of forking it.
- Open the starter repository: https://github.com/shanep/makefile-project-starter
- Click the green Use this template button and choose Create a new repository.
- Pick your personal GitHub account as the owner and name the repository cs452-p6.
- Click Create repository.
Your new repository is not a fork, so it has no upstream remote. That is on purpose: everything you need is already in your copy.
Start a new Codespace
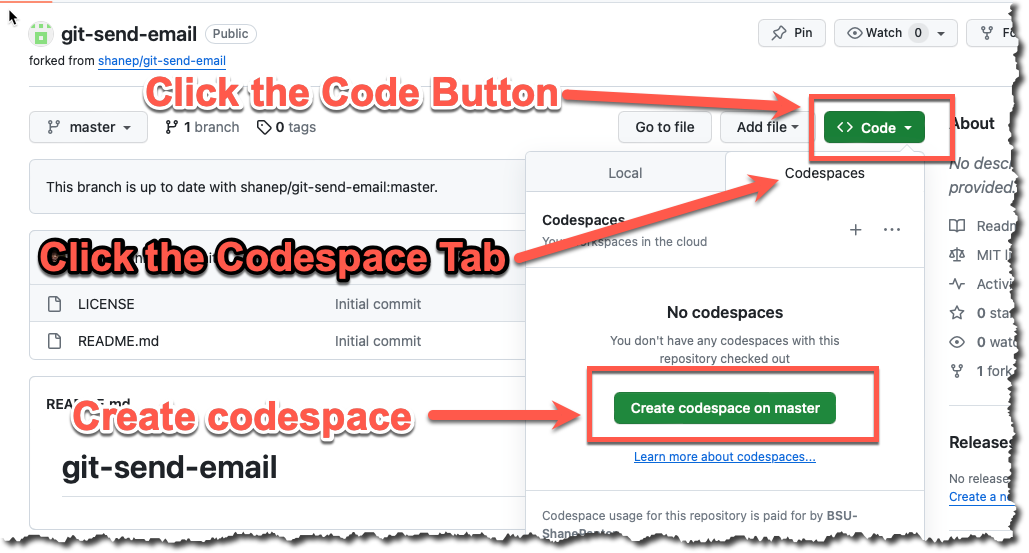
We will use GitHub Codespaces to do most of our coding. Codespaces is just VS Code in the cloud. This makes it really easy to set up a developer environment and code from any computer that has a browser and internet connection! From your new repository click Code, then the Codespaces tab, then Create codespace on master.
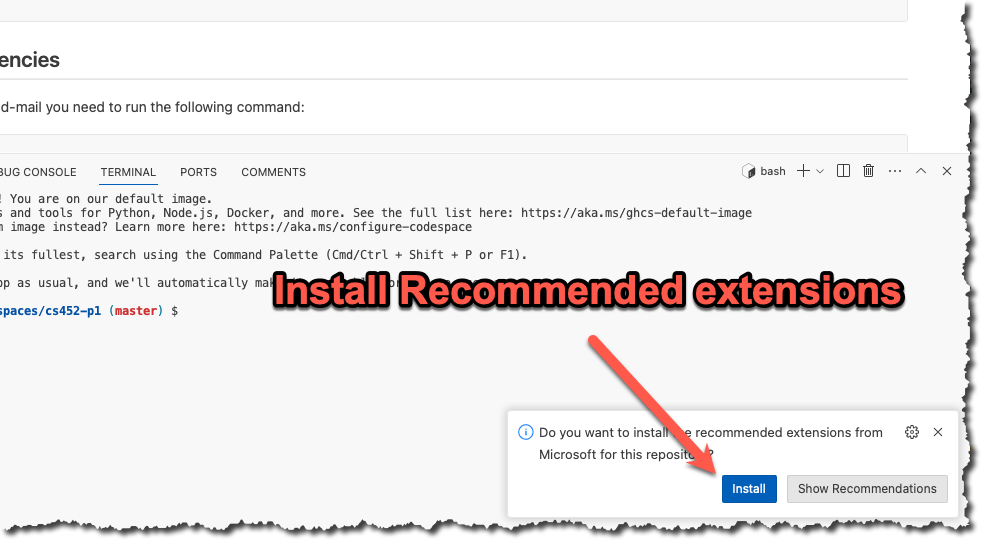
If you are asked to install recommended extensions, click "install". You may not be asked to install extensions if you are already syncing your account.
INFO
If you work on Onyx or your own machine instead, clone your repository with git clone and make sure you have gcc (or clang), make, and gcovr installed. The Codespace comes with all of these. The file docs/onyx.md in your repository has notes on using Onyx.
Get to know the starter
Here is what you get in the starter repository.
src/main.c- themainfunction for the executablesrc/lab.handsrc/lab.c- the library code that both the executable and the tests usetests/lab-test.c- your unit tests, written with the Unity test frameworktests/harness/- the Unity framework itself, don't edit these filesREADME.md- you will fill this out before you submitscripts/create-submission-report.shand.github/workflows/- continuous integration and the submission report
The Makefile builds every C file in src/ and tests/. The test build defines TEST, and src/main.c uses that to rename its main function so it does not clash with the main in tests/lab-test.c. Keep these lines at the top of src/main.c in every project.
#ifdef TEST
#define main main_exclude
#endif
These are the make targets you will use the most. Run make help to see them all.
| Command | What it does |
|---|---|
make all | Builds all four versions of the project listed below |
make check | Runs the unit tests in build/tests/myapp_t |
make leak | Runs the debug executable with Address Sanitizer leak checking on |
make leak-test | Runs the unit tests with Address Sanitizer leak checking on |
make report | Runs the unit tests and creates a code coverage report in build/report |
make clean | Deletes the build directory |
make all creates four programs.
build/release/myapp- the optimized executable, compiled with all the warning flagsbuild/debug/myapp_d- the executable compiled with Address Sanitizerbuild/tests/myapp_t- the unit tests compiled for code coveragebuild/debug-test/myapp_td- the unit tests compiled with Address Sanitizer
If there is no src/main.c then make all skips the executable and only builds the tests. That is how the projects that are 100% unit tests work.
WARNING
make check, make leak, make leak-test, and make report run whatever is already in build/. They do not recompile your code. Run make all after every change or you will be testing old code. Also, make all prints "Builds completed" even when one of the builds failed, so scroll up and read the output.
Task 2 - Prepare your repository
The starter repository is a bare bones template that you will need to update with the starter code below.
src/lab.h
#ifndef LAB_H
#define LAB_H
#include <stdlib.h>
#include <stdbool.h>

#ifdef __cplusplus
extern "C"
{
#endif

    /**
     * @brief opaque type definition for a queue
     */
    typedef struct queue *queue_t;

    /**
     * @brief Initialize a new queue
     *
     * @param capacity the maximum capacity of the queue
     * @return A fully initialized queue
     */
    queue_t queue_init(int capacity);

    /**
     * @brief Frees all memory and related data and signals all waiting threads.
     *
     * @param q a queue to free
     */
    void queue_destroy(queue_t q);

    /**
     * @brief Adds an element to the back of the queue
     *
     * @param q the queue
     * @param data the data to add
     */
    void enqueue(queue_t q, void *data);

    /**
     * @brief Removes the first element in the queue. Blocks while the queue is empty, unless
     * the queue has been shut down.
     *
     * @param q the queue
     * @return the first element, or NULL once the queue is shut down and empty
     */
    void *dequeue(queue_t q);

    /**
     * @brief Set the shutdown flag in the queue so all threads can
     * complete and exit properly
     *
     * @param q The queue
     */
   void queue_shutdown(queue_t q);

    /**
     * @brief Returns true if the queue is empty
     *
     * @param q the queue
     */
    bool is_empty(queue_t q);

    /**
     * @brief Returns true if queue_shutdown has been called on the queue
     *
     * @param q The queue
     */
    bool is_shutdown(queue_t q);

#ifdef __cplusplus
} // extern "C"
#endif

#endif
src/main.c
#include <stdio.h>
#include <stdlib.h>
#include <pthread.h>
#include <unistd.h>
#include <stdbool.h>
#include <time.h>
#include <sys/time.h> /* for gettimeofday system call */
#include "lab.h"

// The test build compiles this file too, so rename main to keep it from
// clashing with the main function in tests/lab-test.c
#ifdef TEST
#define main main_exclude
#endif

#define UNUSED(x) (void)x
#define MAX_C 8           /* Maximum number of consumer threads */
#define MAX_P 8           /* Maximum number of producer threads */
#define MAX_SLEEP 1000000 /* maximum time a thread can sleep in nanoseconds*/

static bool delay = false;

static double getMilliSeconds(void)
{
     struct timeval now;
     gettimeofday(&now, (struct timezone *)0);
     return (double)now.tv_sec * 1000.0 + now.tv_usec / 1000.0;
}

/*Track the total items produced and consumed*/
static struct
{
     unsigned int num;
     pthread_mutex_t lock;
} numproduced = {0, PTHREAD_MUTEX_INITIALIZER},
  numconsumed = {0, PTHREAD_MUTEX_INITIALIZER};

/*Shared queue that producers and consumers will access*/
static queue_t pc_queue;

/**
 * Produces items at a random interval. Exits once it has produced
 * the correct number of items.
 */
static void *producer(void *args)
{

     int num = *((int *)args);
     //pthread_t tid = pthread_self();
     unsigned int seedp = 0;
     struct timespec s = {0, 0};
     int *itm = NULL;

     // fprintf(stderr, "Producer thread: %ld - producing %d items\n", tid, num);
     for (int i = 0; i < num; i++)
     {
          if (delay)
          {
               /*simulate producing the item*/
               s.tv_nsec = (rand_r(&seedp) % MAX_SLEEP);
               nanosleep(&s, NULL);
          }

          itm = (int *)malloc(sizeof(int));
          *itm = i;
          // Put the item into the queue
          enqueue(pc_queue, itm);

          // Update counters for testing purposes
          pthread_mutex_lock(&numproduced.lock);
          numproduced.num++;
          pthread_mutex_unlock(&numproduced.lock);
     }
     // fprintf(stderr, "Producer thread: %ld - Done producing!\n", tid);
     pthread_exit(NULL);
}

/**
 * Consumes items.
 */
static void *consumer(void *args)
{
     UNUSED(args);
     //pthread_t tid = pthread_self();
     unsigned int seedp = 0;
     struct timespec s = {0, 0};
     int *itm = NULL;
     // fprintf(stderr, "Consumer thread: %ld\n", tid);

     while (true)
     {
          if (delay)
          {
               /*simulate consuming the item*/
               s.tv_nsec = (rand_r(&seedp) % MAX_SLEEP);
               nanosleep(&s, NULL);
          }

          itm = (int *)dequeue(pc_queue);
          if (itm)
          {
               free(itm);
               itm = NULL;
               // Update counters for testing purposes
               pthread_mutex_lock(&numconsumed.lock);
               numconsumed.num++;
               pthread_mutex_unlock(&numconsumed.lock);
          }
          else
          {
               // If the queue is implemented correctly we should not
               // get a NULL item during normal operation. It is possible to
               // get a NULL item AFTER shutdown has been called which is fine
               // because we are just cleaning up all the items.
               if (!is_shutdown(pc_queue))
               {
                    fprintf(stderr, "ERROR: Got a null item when queue was not shutdown!\n");
               }
               break;
          }
     }
     // fprintf(stderr, "Consumer Thread: %ld - Done consuming!\n", tid);
     pthread_exit(NULL);
}

static void usage(char *n)
{
     fprintf(stderr, "Usage: %s [-c num consumer] [-p num producer] [-i num items] [-s queue size] <-d introduce delay>\n", n);
     fprintf(stderr, "-d will introduce a random delay between consumer and producer\n");
     exit(EXIT_FAILURE);
}

int main(int argc, char *argv[])
{
     int nump = 1;       /*total number of producers*/
     int numc = 1;       /*total number of consumers*/
     int numitems = 10;  /*total number of items, split between the producers*/
     int queue_size = 5; /*The default size of the queue*/
     int c;

     pthread_t producers[MAX_P];
     pthread_t consumers[MAX_C];

     while ((c = getopt(argc, argv, "c:p:i:s:dh")) != -1)
          switch (c)
          {
          case 'c':
               numc = atoi(optarg);
               break;
          case 'p':
               nump = atoi(optarg);
               ;
               break;
          case 'i':
               numitems = atoi(optarg);
               break;
          case 's':
               queue_size = atoi(optarg);
               break;
          case 'd':
               delay = true;
               break;
          case 'h':
               usage(argv[0]);
               break;
          default: /* ? */
               usage(argv[0]);
          }
     if (numc < 1 || nump < 1 || numitems < 1 || queue_size < 1)
          usage(argv[0]);
     if (numc > MAX_C)
          numc = MAX_C;
     if (nump > MAX_P)
          nump = MAX_P;

     int per_thread = numitems / nump;
     fprintf(stderr, "Simulating %d producers %d consumers with %d items per thread and a queue size of %d\n", nump, numc, per_thread, queue_size);
     // Start our timing
     double end = 0;
     double start = getMilliSeconds();

     // Initialize the queue for usage
     pc_queue = queue_init(queue_size);
     /*Create the producer threads*/
     for (int i = 0; i < nump; i++)
     {
          pthread_create(&producers[i], NULL, producer, (void *)&per_thread);
     }

     fprintf(stderr, "Creating %d consumer threads\n", numc);
     /*Create the consumer threads*/
     for (int i = 0; i < numc; i++)
     {
          pthread_create(&consumers[i], NULL, consumer, (void *)NULL);
     }

     /*Wait for all the producer threads to finish*/
     for (int i = 0; i < nump; i++)
     {
          pthread_join(producers[i], NULL);
     }

     // Once all the producers are finished we set a flag so the consumer thread can finish up
     // Once shutdown is called your queue should drain all remaining items and be ready for
     // destruction!
     queue_shutdown(pc_queue);

     /*Wait for all the consumer threads to finish*/
     for (int i = 0; i < numc; i++)
     {
          pthread_join(consumers[i], NULL);
     }

     if (numproduced.num != numconsumed.num)
     {
          fprintf(stderr, "ERROR! produced != consumed\n");
          abort();
     }
     fprintf(stderr, "Queue is empty:%s\n", is_empty(pc_queue) ? "true" : "false");
     fprintf(stderr, "Total produced:%u\n", numproduced.num);
     fprintf(stderr, "Total consumed:%u\n", numconsumed.num);

     // Free up all the stuff we allocated
     queue_destroy(pc_queue);

     // End our timing
     end = getMilliSeconds();
     // Print timing to standard out to graph
     fprintf(stdout, " %f %u \n", end - start, numproduced.num);

     return 0;
}
tests/lab-test.c
#include "harness/unity.h"
#include "../src/lab.h"

// NOTE: Due to the multi-threaded nature of this project, unit testing for this
// project is limited. I have provided you with a command line tester in
// the file src/main.c. Be aware that the examples below do not test the
// multi-threaded nature of the queue. You will need to use the command line
// tester to test the multi-threaded nature of your queue. Passing these tests
// does not mean your queue is correct. It just means that it can add and remove
// elements from the queue below the blocking threshold.


void setUp(void) {
  // set stuff up here
}

void tearDown(void) {
  // clean stuff up here
}


void test_create_destroy(void)
{
    queue_t q = queue_init(10);
    TEST_ASSERT_TRUE(q != NULL);
    queue_destroy(q);
}

void test_queue_dequeue(void)
{
    queue_t q = queue_init(10);
    TEST_ASSERT_TRUE(q != NULL);
    int data = 1;
    enqueue(q, &data);
    TEST_ASSERT_TRUE(dequeue(q) == &data);
    queue_destroy(q);
}

void test_queue_dequeue_multiple(void)
{
    queue_t q = queue_init(10);
    TEST_ASSERT_TRUE(q != NULL);
    int data = 1;
    int data2 = 2;
    int data3 = 3;
    enqueue(q, &data);
    enqueue(q, &data2);
    enqueue(q, &data3);
    TEST_ASSERT_TRUE(dequeue(q) == &data);
    TEST_ASSERT_TRUE(dequeue(q) == &data2);
    TEST_ASSERT_TRUE(dequeue(q) == &data3);
    queue_destroy(q);
}

void test_queue_dequeue_shutdown(void)
{
    queue_t q = queue_init(10);
    TEST_ASSERT_TRUE(q != NULL);
    int data = 1;
    int data2 = 2;
    int data3 = 3;
    enqueue(q, &data);
    enqueue(q, &data2);
    enqueue(q, &data3);
    TEST_ASSERT_TRUE(dequeue(q) == &data);
    TEST_ASSERT_TRUE(dequeue(q) == &data2);
    queue_shutdown(q);
    TEST_ASSERT_TRUE(dequeue(q) == &data3);
    TEST_ASSERT_TRUE(is_shutdown(q));
    TEST_ASSERT_TRUE(is_empty(q));
    queue_destroy(q);
}

int main(void) {
  UNITY_BEGIN();
  RUN_TEST(test_create_destroy);
  RUN_TEST(test_queue_dequeue);
  RUN_TEST(test_queue_dequeue_multiple);
  RUN_TEST(test_queue_dequeue_shutdown);
  return UNITY_END();
}
Delete the get_greeting function in src/lab.c, you will implement the queue in that file. This project uses threads, so you need to turn on -pthread in the Makefile. Open up the Makefile and remove the # from the start of the line shown below.
# For threading uncomment the next line
LDFLAGS ?= -pthread
Once you have updated all the starter code let's make your first commit so everything is saved. Open up a terminal and let's make a commit!
git add --all
git commit -m "Added in starter code"
Task 3 - Implement the header file
Implement all the functions defined in src/lab.h in src/lab.c. The queue is a monitor, so every function that touches the queue must hold its lock, and enqueue and dequeue must use condition variables to block when the queue is full or empty. Once queue_shutdown is called, dequeue returns the items that are left and then returns NULL instead of blocking, which is how the consumer threads know to exit.
Task 4 - Test with the driver
The unit tests only check that the queue works with a single thread. The real test is the driver in src/main.c, which runs the bounded buffer problem with your queue. It creates a queue, starts the producer threads and consumer threads, and then does the following.
- Each producer allocates its share of the items with
mallocand callsenqueueto put them in the queue - Each consumer calls
dequeueand frees each item untildequeuereturns NULL - Once all the producers are done,
maincallsqueue_shutdownand waits for the consumers to drain the queue - At the end
mainchecks that the number of items produced matches the number consumed and callsabortif they don't match, then callsqueue_destroy
You can control the simulation with the command line options below.
| Option | What it does | Default |
|---|---|---|
-p | Number of producer threads (maximum 8) | 1 |
-c | Number of consumer threads (maximum 8) | 1 |
-i | Total number of items, split evenly between the producers (remainder dropped) | 10 |
-s | The capacity of the queue | 5 |
-d | Add a random delay of up to 1 millisecond before each produce or consume | off |
-h | Print the usage message |
The status messages go to standard error. The last line goes to standard out and is the time in milliseconds followed by the number of items produced, so you can redirect it to a file and graph it. Here is a run with 2 producers, 4 consumers, 1000 items, and a queue that holds 10 items.
$ ./build/release/myapp -p 2 -c 4 -i 1000 -s 10
Simulating 2 producers 4 consumers with 500 items per thread and a queue size of 10
Creating 4 consumer threads
Queue is empty:true
Total produced:1000
Total consumed:1000
 4.802979 1000
Run the driver with lots of different combinations of threads, items, and queue sizes, with and without -d. A small queue with lots of threads is the best way to find a deadlock or a race condition. Also run the debug build, ./build/debug/myapp_d, so Address Sanitizer can catch any memory errors. If the driver hangs, the Additional Resources section of Project 5 shows you how to attach gdb and see where each thread is stuck.
Final Task - Submit your code
Now that you have completed all the tasks, the only thing left to do is to create a submission report and upload it to Canvas so you can receive a grade for all your hard work.
Update your README
Open up README.md and fill in every section.
- Your name, email, and class section at the top
- Known Bugs or Issues - anything that does not work
- Experience - your struggles and breakthroughs with the project
- Analysis - only if the project asks for one, otherwise delete the section
Check your build
Run the same commands that the continuous integration (CI) workflow runs and make sure you get a clean build with no warnings, all tests passing, and no Address Sanitizer errors.
make clean
make all
make check
make leak-test
Then run make report and look at the coverage numbers at the bottom of the output. The grading rubric explains how coverage is graded.
Push and check CI
Commit and push all your work.
git add --all
git commit -m "Finished the project"
git push
Open your repository on GitHub, click the Actions tab, then Continuous Integration (CI), and confirm that the run for your last push is green. If it is not, open the run, read the output, and fix the problem.
Create the submission report
- In the Actions tab click Create Submission Report Via GitHub Action.
- Click Run workflow and run it on the
masterbranch. - Wait for the run to finish and then refresh your repository. You will now have a file named
submission-report.docxthat contains your README, the build output, the test results, the coverage report, the Address Sanitizer report, and all your code. - The workflow added a commit to your repository, so run
git pullin your Codespace (or wherever you cloned the repository) before you make any more changes. If you skip this, your next push will be rejected.
DANGER
Do NOT edit the generated report. The report ends with a hash of its contents and any changes will be reported as academic dishonesty. If something in the report is wrong, fix your code, push, and run the workflow again.
GitHub Actions is down
If GitHub Actions is down, or the workflow hangs for more than 5 minutes, you can generate the report on Onyx instead. Follow the steps in docs/onyx.md in your repository, which install gcovr and run scripts/create-submission-report.sh.
Submitting
Download submission-report.docx from GitHub and submit it to Canvas. You can view your own submission in Canvas, so open it and make sure everything looks right. Your grade will be updated after the due date (and late window) has passed.