Project 5

Overview
In this lab, you are tasked with taking an existing data structure that is not thread safe and wrapping it to use in a multi-threaded environment. In industry you may be tasked with modifying legacy code to work in a multi-threaded environment so this is a critical skill to master while in school 😃.
You are given an existing implementation of merge sort. This implementation is derived directly from the book "Introduction to Algorithms" by Cormen, Leiserson, Rivest, and Stein. Your job is to wrap this algorithm so you can use it in a multi-threaded environment.
Learning Outcomes
- 1.4 Apply computer science theory and software development fundamentals to produce computing-based solutions. (ABET Outcome 6)
- 1.5 Use simple shell scripts and system tools to analyze process behavior
- 3.1 Analyze a complex computing problem and apply principles of computing and other relevant disciplines to identify solutions. (ABET Outcome 1)
- 3 Construct applications that utilize processes, threads, and synchronization primitives to solve problems requiring concurrent or parallel computation
- 3.2 Explore the effects of multiple threads operating on the same buffer
Grading Rubric
Make sure and review the class grading rubric so you know how your project will be graded.
Task 1 - Setup
Follow the steps below to get your repository all set up and ready to use. The steps below show you how to use and set up GitHub Codespaces. You are not required to use Codespaces. All the steps below can be completed on Onyx (the CS lab machines) or on your personal machine if you prefer.
Create your repository from the template
The starter repository is a GitHub template, so you make your own copy of it instead of forking it.
- Open the starter repository: https://github.com/shanep/makefile-project-starter
- Click the green Use this template button and choose Create a new repository.
- Pick your personal GitHub account as the owner and name the repository cs452-p5.
- Click Create repository.
Your new repository is not a fork, so it has no upstream remote. That is on purpose: everything you need is already in your copy.
Start a new Codespace
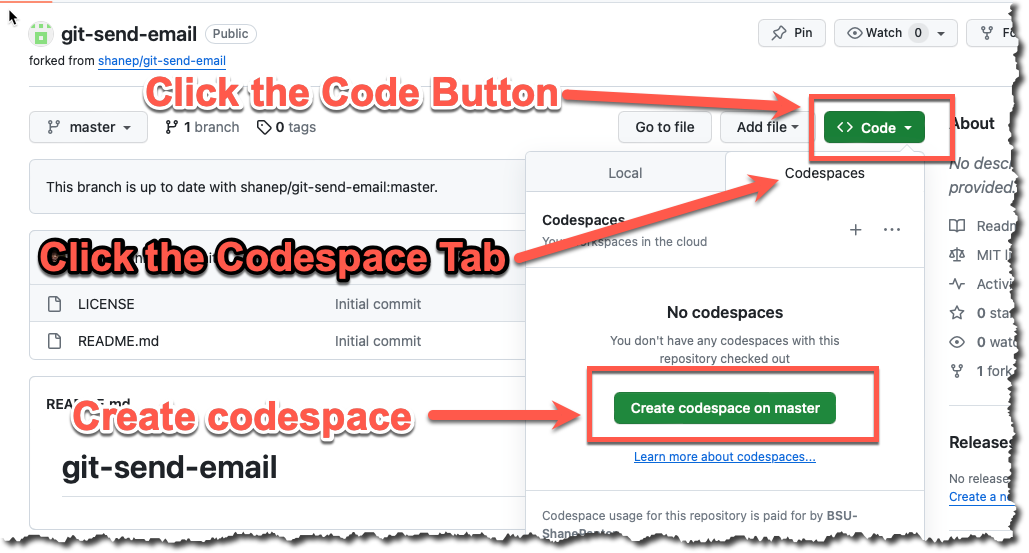
We will use GitHub Codespaces to do most of our coding. Codespaces is just VS Code in the cloud. This makes it really easy to set up a developer environment and code from any computer that has a browser and internet connection! From your new repository click Code, then the Codespaces tab, then Create codespace on master.
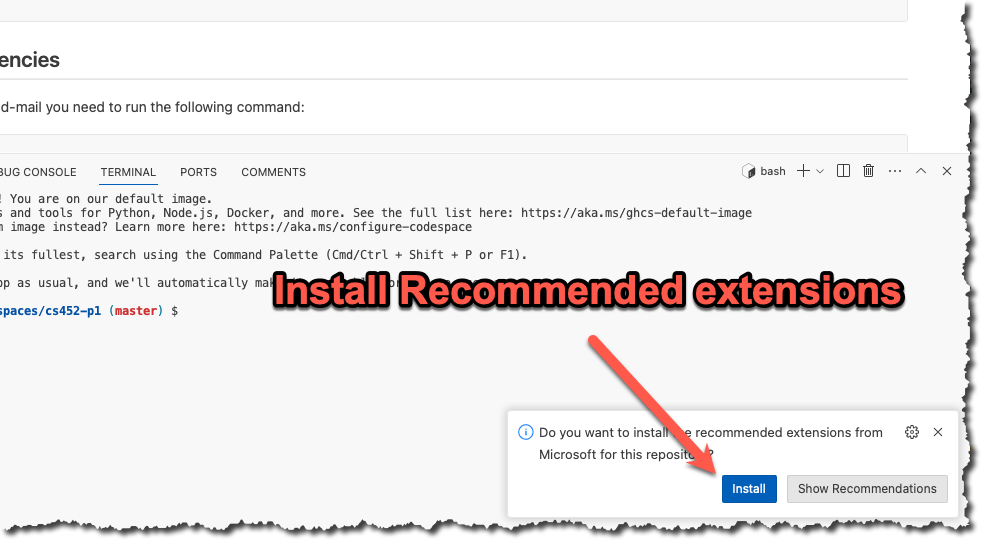
If you are asked to install recommended extensions, click "install". You may not be asked to install extensions if you are already syncing your account.
INFO
If you work on Onyx or your own machine instead, clone your repository with git clone and make sure you have gcc (or clang), make, and gcovr installed. The Codespace comes with all of these. The file docs/onyx.md in your repository has notes on using Onyx.
Get to know the starter
Here is what you get in the starter repository.
src/main.c- themainfunction for the executablesrc/lab.handsrc/lab.c- the library code that both the executable and the tests usetests/lab-test.c- your unit tests, written with the Unity test frameworktests/harness/- the Unity framework itself, don't edit these filesREADME.md- you will fill this out before you submitscripts/create-submission-report.shand.github/workflows/- continuous integration and the submission report
The Makefile builds every C file in src/ and tests/. The test build defines TEST, and src/main.c uses that to rename its main function so it does not clash with the main in tests/lab-test.c. Keep these lines at the top of src/main.c in every project.
#ifdef TEST
#define main main_exclude
#endif
These are the make targets you will use the most. Run make help to see them all.
| Command | What it does |
|---|---|
make all | Builds all four versions of the project listed below |
make check | Runs the unit tests in build/tests/myapp_t |
make leak | Runs the debug executable with Address Sanitizer leak checking on |
make leak-test | Runs the unit tests with Address Sanitizer leak checking on |
make report | Runs the unit tests and creates a code coverage report in build/report |
make clean | Deletes the build directory |
make all creates four programs.
build/release/myapp- the optimized executable, compiled with all the warning flagsbuild/debug/myapp_d- the executable compiled with Address Sanitizerbuild/tests/myapp_t- the unit tests compiled for code coveragebuild/debug-test/myapp_td- the unit tests compiled with Address Sanitizer
If there is no src/main.c then make all skips the executable and only builds the tests. That is how the projects that are 100% unit tests work.
WARNING
make check, make leak, make leak-test, and make report run whatever is already in build/. They do not recompile your code. Run make all after every change or you will be testing old code. Also, make all prints "Builds completed" even when one of the builds failed, so scroll up and read the output.
Task 2 - Prepare your repository
The starter repository is a bare bones template that you will need to update with the starter code below.
src/lab.h
#ifndef LAB_H
#define LAB_H
#include <pthread.h>

#ifdef __cplusplus
extern "C"
{
#endif

  // The threshold that we will use to switch to insertion sort, make sure that
  // you use test arrays bigger than INSERTION_SORT_THRESHOLD so you are testing
  // the merge sort
#define INSERTION_SORT_THRESHOLD 2
#define MAX_THREADS 32
  /**
   * @brief Sorts an array of ints into ascending order using the constant
   * INSERTION_SORT_THRESHOLD internally
   *
   * @param A A pointer to the start of the array
   * @param p The starting index
   * @param r The ending index
   */
  void mergesort_s(int *A, int p, int r);

  /**
   * @brief Merge two sorted sequences A[p..q] and A[q+1..r] and place merged
   *              output back in array A. Uses extra space proportional to
   *              A[p..r].
   *
   * @param A The array to merge into
   * @param p The starting index of the first half
   * @param q The middle
   * @param r The ending index of the second half
   */
  void merge_s(int A[], int p, int q, int r);

  /**
   * @brief Sorts an array of ints into ascending order using multiple
   * threads
   *
   * @param A A pointer to the start of the array
   * @param n The size of the array
   * @param num_threads The number of threads to use.
   */
  void mergesort_mt(int *A, int n, int num_threads);

  /**
   * @brief returns the current time as milliseconds
   * @return the number of milliseconds
   */
  double getMilliSeconds(void);

  /**
   * @brief Represents a chunk of the array to be sorted by a thread
   *
   */
  struct parallel_args
  {
    int *A;
    int start;
    int end;
    pthread_t tid;
  };

  /**
   * @brief The function that is called by each thread to sort their chunk
   *
   * @param args see struct parallel_args
   * @return void* always NULL
   */
  void *parallel_mergesort(void *args);

#ifdef __cplusplus
} // extern "C"
#endif

#endif
src/main.c
#include <stdio.h>
#include <stdlib.h>
#include "lab.h"

// The test build compiles this file too, so rename main to keep it from
// clashing with the main function in tests/lab-test.c
#ifdef TEST
#define main main_exclude
#endif

int main(int argc, char **argv)
{

  if (argc < 3)
    {
      printf("usage: %s <array_size> <num_threads>\n", argv[0]);
      return 1;
    }
  int size = atoi(argv[1]);
  int t = atoi(argv[2]);

  int *A_ = malloc(sizeof(int) * (size_t)size);
  srandom(1);
  for (int i = 0; i < size; i++)
    A_[i] = (int)(random() % 100000);

  double end = 0;
  double start = getMilliSeconds();
  mergesort_mt(A_, size, t);
  end = getMilliSeconds();
  printf("%f %d\n",end-start, t);

  free(A_);
  return 0;
}
src/lab.c
#include <stdlib.h>
#include <sys/time.h> /* for gettimeofday system call */
#include "lab.h"

/**
 * @brief Standard insertion sort that is faster than merge sort for small arrays
 *
 * @param A The array to sort
 * @param p The starting index
 * @param r The ending index
 */
static void insertion_sort(int A[], int p, int r)
{
  int j;

  for (j = p + 1; j <= r; j++)
    {
      int key = A[j];
      int i = j - 1;
      while ((i > p - 1) && (A[i] > key))
        {
	  A[i + 1] = A[i];
	  i--;
        }
      A[i + 1] = key;
    }
}


void mergesort_s(int A[], int p, int r)
{
  if (r - p + 1 <=  INSERTION_SORT_THRESHOLD)
    {
      insertion_sort(A, p, r);
    }
  else
    {
      int q = (p + r) / 2;
      mergesort_s(A, p, q);
      mergesort_s(A, q + 1, r);
      merge_s(A, p, q, r);
    }

}

void merge_s(int A[], int p, int q, int r)
{
  int *B = (int *)malloc(sizeof(int) * (size_t)(r - p + 1));

  int i = p;
  int j = q + 1;
  int k = 0;
  int l;

  /* as long as both lists have unexamined elements */
  /*  this loop keeps executing. */
  while ((i <= q) && (j <= r))
    {
      if (A[i] < A[j])
        {
	  B[k] = A[i];
	  i++;
        }
      else
        {
	  B[k] = A[j];
	  j++;
        }
      k++;
    }

  /* now only at most one list has unprocessed elements. */
  if (i <= q)
    {
      /* copy remaining elements from the first list */
      for (l = i; l <= q; l++)
        {
	  B[k] = A[l];
	  k++;
        }
    }
  else
    {
      /* copy remaining elements from the second list */
      for (l = j; l <= r; l++)
        {
	  B[k] = A[l];
	  k++;
        }
    }

  /* copy merged output from array B back to array A */
  k = 0;
  for (l = p; l <= r; l++)
    {
      A[l] = B[k];
      k++;
    }

  free(B);
}

double getMilliSeconds(void)
{
  struct timeval now;
  gettimeofday(&now, (struct timezone *)0);
  return (double)now.tv_sec * 1000.0 + now.tv_usec / 1000.0;
}
tests/lab-test.c
#include "harness/unity.h"
#include "../src/lab.h"
#include <stdlib.h>


static int defaultRange = 10;
static int defaultSize = 103;
static int defaultSeed = 1;
static int *expected = NULL;
static int *actual = NULL;

void setUp(void) {
  actual = malloc(sizeof(int) *defaultSize);
  expected = malloc(sizeof(int) *defaultSize);
  srandom(defaultSeed);
  for (int i = 0; i < defaultSize; i++){
    int value = random() % defaultRange;
    actual[i]= value;
    expected[i] =value;
  }
}

void tearDown(void) {
  free(actual);
  free(expected);
}

int compare_ints(const void* a, const void* b)
{
    int arg1 = *(const int*)a;
    int arg2 = *(const int*)b;

    if (arg1 < arg2) return -1;
    if (arg1 > arg2) return 1;
    return 0;
 }

void test_mergesort_mt_small_one_thread(void)
{
  //Run our sort and the C library qsort to compare to
  mergesort_mt(actual, defaultSize, 1);
  qsort(expected, defaultSize, sizeof(int), compare_ints);
  TEST_ASSERT_EQUAL_INT32_ARRAY(expected, actual, defaultSize);
}

void test_mergesort_mt_small_two_threads(void)
{
  mergesort_mt(actual, defaultSize, 2);
  qsort(expected, defaultSize, sizeof(int), compare_ints);
  TEST_ASSERT_EQUAL_INT32_ARRAY(expected, actual, defaultSize);
}

void test_mergesort_mt_small_three_threads(void)
{
  mergesort_mt(actual, defaultSize, 3);
  qsort(expected, defaultSize, sizeof(int), compare_ints);
  TEST_ASSERT_EQUAL_INT32_ARRAY(expected, actual, defaultSize);
}


int main(void) {
  UNITY_BEGIN();
  RUN_TEST(test_mergesort_mt_small_one_thread);
  RUN_TEST(test_mergesort_mt_small_two_threads);
  RUN_TEST(test_mergesort_mt_small_three_threads);
  return UNITY_END();
}
This project uses threads, so you need to turn on -pthread in the Makefile. Open up the Makefile and remove the # from the start of the line shown below.
# For threading uncomment the next line
LDFLAGS ?= -pthread
Once you have updated all the starter code let's make your first commit so everything is saved. Open up a terminal and let's make a commit!
git add --all
git commit -m "Added in starter code"
Task 3 - Make Thread safe (ABET Outcome 6)
Read through the files src/lab.h and src/lab.c in the project to make sure you understand the algorithm. You are not allowed to modify the single threaded implementation, instead you must implement the function mergesort_mt. Your implementation needs to split up the array into equal chunks and then hand each chunk to a new thread. You will then use pthread_join to wait for all the chunks to be sorted at which point you will need to merge the results together. You will not need to use locks for this approach because you are taking a large array and splitting it up between threads so each thread only operates on its section of the larger array. C pointers come in really handy for this approach because you can keep the original array in place and just declare new pointers into separate chunks of the existing array.
Task 4 - Driver app
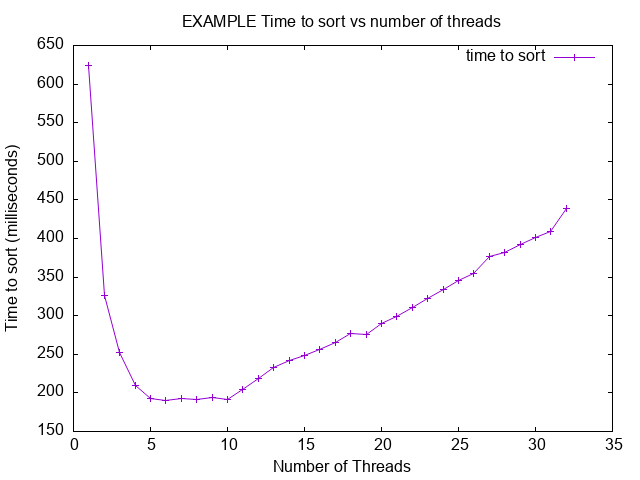
Once you have completed writing the multi-threaded version of the code you will need to test your code with a simple command line driver that will take two command line arguments and output the number of threads used and the total time to sort the array as shown in the example below. You should see a speed up when you increase the number of threads used to sort the array. However, if you add too many threads you will see a slow down because of the overhead of context switching between threads. You will need to experiment with the number of threads to see what the optimal number is for your machine and document that in the ## Analysis section of your README.md (see Task 6).
$ ./build/release/myapp
usage: ./build/release/myapp <array_size> <num_threads>
$ ./build/release/myapp 1000 2
0.082031 2
$ ./build/release/myapp 1000 3
0.104004 3
Task 5 - Add bash files
Below is an example bash script and a gnuplot macro file that you will need to use to generate a nice plot showing the speedup when using multiple threads. You will need to install gnuplot on your machine to complete this task. The lab machines in the CS department already have gnuplot installed. You can install gnuplot in Codespaces using sudo apt-get install -y gnuplot.
You will need to modify the script to use in your project! The script will NOT work as is. Part of this project is to learn how to modify scripts to automate tasks.
#!/usr/bin/env bash
#NOTE!!! THIS WILL NOT WORK IF YOU JUST COPY AND PASTE IT INTO YOUR PROJECT
#YOU WILL NEED TO MODIFY IT TO WORK WITH YOUR PROJECT
function usage() {
    echo "$0 usage:" && grep " .)\ #" $0
    exit 0
}
[ $# -eq 0 ] && usage
while getopts "hs:f:" arg; do
    case $arg in
    s) # The size of the array to sort.
        size=${OPTARG}
        ;;
    f) # The plot file name
        name=${OPTARG}
        ;;
    h | *) # Display help.
        usage
        exit 0
        ;;
    esac
done
if [ "$name" == "" ] || [ "$size" == "" ]
then
        usage
        exit 0
fi
if [ -e ./build/release/myapp ]; then
    if [ -e "data.dat" ]; then
        rm -f data.dat
    fi
    echo "Running myapp to generate data"
    echo "#Time Threads" >> data.dat
    for n in {1..32}; do
        echo -ne "running $n thread \r"
        ./build/release/myapp "$size" "$n" >> data.dat
    done
    gnuplot -e "filename='$name.png'" graph.plt
    echo "Created plot $name.png from data.dat file"
else
    echo "myapp is not present in the build directory. Did you run make all?"
fi# Gnuplot script file for plotting data in file "data.dat"
set autoscale # scale axes automatically
unset log # remove any log-scaling
unset label # remove any previous labels
set title "Time to sort vs number of threads"
set xlabel "Number of Threads"
set ylabel "Time to sort (milliseconds)"
set style data linespoints
set term png
set output filename
plot "data.dat" using 2:1 t "time to sort"Assuming that you named your script createplot.sh and the gnuplot file graph.plt you can now generate your plot as follows:
$ ./createplot.sh -s 10000000 -f student_plot
Running myapp to generate data
Created plot student_plot.png from data.dat file
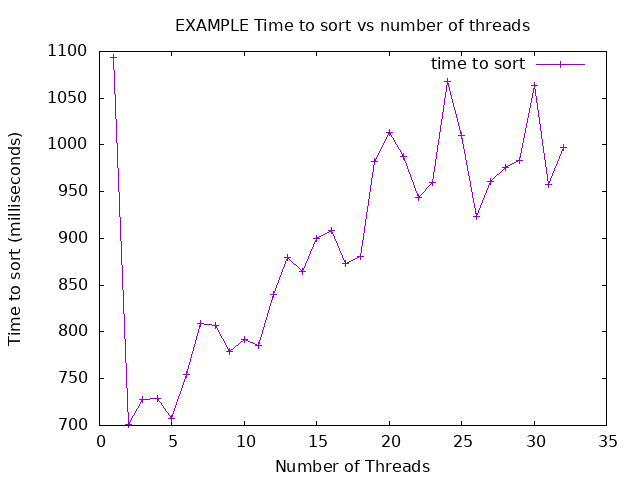
After the script finishes you should see a new file named student_plot.png. Two example plots are shown below, that show the same code running on two different machines.
Task 6 - Complete the Analysis (ABET Outcome 1)
Once you have completed all the tasks open up your README.md and fill in the section named ## Analysis. In this section you will need to include your graph as an image so it will display when viewed on GitHub, the README in the starter shows you how. You will then need to talk about your results. Your discussion should be at least 500 words.
- Were you able to generate something close to what the example showed? Why or why not?
- Did you see a slowdown at some point? Why or why not?
- Did your program run faster and faster when you added more threads? Why or why not?
- What was the optimum number of threads for your machine?
- What was the slowest number of threads for your machine?
If your graph does not look like the example graph you will need to explain why, maybe go back and look at your original implementation, did you make a mistake somewhere? If you found a bug in your original implementation please note that and explain what you fixed 😃.
Additional Resources
When you are working on multi-threaded programs it is pretty easy to get into a deadlocked scenario. Debugging multi-threaded programs can be difficult because running your program under the debugger can change the timing of your code and thus make the issue go away. So sometimes the only way to see where your program is stuck is to attach a debugger to the running process and dump out the threads.
So assuming you have a program that you ran and it is currently stuck somewhere here are the steps to at least see where it is stuck which can help you fix the issue!
Get the PID of the process
Before you attach a debugger you want to confirm that your program is completely stopped and you want to get the pid of the program so you can attach to it. Open up a second terminal and run the command ps ux and look for your program. If you can’t find your program you can try ps aux which will output all users. If you still can't find it make sure that your program hasn’t exited. NOTE: You cannot attach to another user's program unless you have access to the root account. You can only attach to your programs. On Ubuntu and in Codespaces the kernel blocks attaching even to your own program unless you use sudo, which is why the example below runs sudo gdb.
In the example below you can see the program ./mylab -c 3 -p 8 -i 100 -s 5 with PID 254167 is what we want to debug.
$ ps ux
USER        PID %CPU %MEM    VSZ   RSS TTY      STAT START   TIME COMMAND
shanepa+  46764  0.0  0.0 1178788    0 ?        S     2020   0:00 /bin/bash
shanepa+ 129368  0.0  0.0 182776  2632 ?        S    10:02   0:01 sshd: shanepanter@pts/32
shanepa+ 129377  0.0  0.0 127848  3864 pts/32   Ss   10:02   0:02 -bash
shanepa+ 154093  0.0  0.0 1178792    0 ?        S     2020   0:00 /bin/bash
shanepa+ 240623  0.0  0.0 1178788    0 ?        S     2020   0:00 /bin/bash
shanepa+ 254167  0.1  0.0 590304   828 pts/32   Sl+  11:36   0:00 ./mylab -c 3 -p 8 -i 100 -s 5
shanepa+ 254357  0.0  0.0 182776  2472 ?        S    11:36   0:00 sshd: shanepanter@pts/6
shanepa+ 254358  0.5  0.0 127716  3536 pts/6    Ss   11:36   0:00 -bash
shanepa+ 254514  0.0  0.0 166156  2392 pts/6    R+   11:36   0:00 ps ux
Attach to the process
In the same terminal that you ran the ps ux command start gdb and attach to the process with the PID that you found in step 1. Once you have attached to the process issue the command thread apply all bt where bt stands for backtrace applied to all the current threads.
The example below shows that we have 4 threads. Thread 1 is the main thread and we can see that it is waiting on a pthread_join which is expected so we don’t need to worry about Thread 1. Thread 2, 3, and 4 are all blocked on a condition variable and we can see in the stack trace they are all stuck in the dequeue function.
$ sudo gdb
GNU gdb (GDB) Red Hat Enterprise Linux 7.6.1-120.el7
Copyright (C) 2013 Free Software Foundation, Inc.
License GPLv3+: GNU GPL version 3 or later <http://gnu.org/licenses/gpl.html>
This is free software: you are free to change and redistribute it.
There is NO WARRANTY, to the extent permitted by law.  Type "show copying"
and "show warranty" for details.
This GDB was configured as "x86_64-redhat-linux-gnu".
For bug reporting instructions, please see:
<http://www.gnu.org/software/gdb/bugs/>.
(gdb) attach 254167
Attaching to process 254167
Reading symbols from /home/ShanePanter/repos/shanep.github.io/os/labs/lab2/_solution/mylab...done.
Reading symbols from /lib64/libpthread.so.0...(no debugging symbols found)...done.
[New LWP 254178]
[New LWP 254177]
[New LWP 254176]
[Thread debugging using libthread_db enabled]
Using host libthread_db library "/lib64/libthread_db.so.1".
Loaded symbols for /lib64/libpthread.so.0
Reading symbols from /lib64/libc.so.6...(no debugging symbols found)...done.
Loaded symbols for /lib64/libc.so.6
Reading symbols from /lib64/ld-linux-x86-64.so.2...(no debugging symbols found)...done.
Loaded symbols for /lib64/ld-linux-x86-64.so.2
Reading symbols from /lib64/libgcc_s.so.1...(no debugging symbols found)...done.
Loaded symbols for /lib64/libgcc_s.so.1
0x00007f067f11e017 in pthread_join () from /lib64/libpthread.so.0
Missing separate debuginfos, use: debuginfo-install glibc-2.17-317.el7.x86_64 libgcc-4.8.5-44.el7.x86_64
(gdb) thread apply all bt
Thread 4 (Thread 0x7f06767fc700 (LWP 254176)):
#0  0x00007f067f120a35 in pthread_cond_wait@@GLIBC_2.3.2 () from /lib64/libpthread.so.0
#1  0x00000000004014a0 in dequeue (q=0x2066010) at queue.c:97
#2  0x0000000000400e55 in consumer (args=0x0) at lab.c:76
#3  0x00007f067f11cea5 in start_thread () from /lib64/libpthread.so.0
#4  0x00007f067ee4596d in clone () from /lib64/libc.so.6
Thread 3 (Thread 0x7f0675ffb700 (LWP 254177)):
#0  0x00007f067f120a35 in pthread_cond_wait@@GLIBC_2.3.2 () from /lib64/libpthread.so.0
#1  0x00000000004014a0 in dequeue (q=0x2066010) at queue.c:97
#2  0x0000000000400e55 in consumer (args=0x0) at lab.c:76
#3  0x00007f067f11cea5 in start_thread () from /lib64/libpthread.so.0
#4  0x00007f067ee4596d in clone () from /lib64/libc.so.6
Thread 2 (Thread 0x7f06757fa700 (LWP 254178)):
#0  0x00007f067f120a35 in pthread_cond_wait@@GLIBC_2.3.2 () from /lib64/libpthread.so.0
#1  0x00000000004014a0 in dequeue (q=0x2066010) at queue.c:97
#2  0x0000000000400e55 in consumer (args=0x0) at lab.c:76
#3  0x00007f067f11cea5 in start_thread () from /lib64/libpthread.so.0
#4  0x00007f067ee4596d in clone () from /lib64/libc.so.6
Thread 1 (Thread 0x7f067f534740 (LWP 254167)):
#0  0x00007f067f11e017 in pthread_join () from /lib64/libpthread.so.0
#1  0x0000000000401151 in main (argc=9, argv=0x7fff5b567418) at lab.c:176
(gdb)
Debug it
Now that we at least know where our process is stuck we can examine the code and come up with all the ways that this scenario could occur. Be aware that the issue may not be in the dequeue function! More likely than not the bug is somewhere else entirely. All this does is give you some insight into where your program is getting stuck NOT where the problem is!
Final Task - Submit your code
Now that you have completed all the tasks, the only thing left to do is to create a submission report and upload it to Canvas so you can receive a grade for all your hard work.
Update your README
Open up README.md and fill in every section.
- Your name, email, and class section at the top
- Known Bugs or Issues - anything that does not work
- Experience - your struggles and breakthroughs with the project
- Analysis - only if the project asks for one, otherwise delete the section
Check your build
Run the same commands that the continuous integration (CI) workflow runs and make sure you get a clean build with no warnings, all tests passing, and no Address Sanitizer errors.
make clean
make all
make check
make leak-test
Then run make report and look at the coverage numbers at the bottom of the output. The grading rubric explains how coverage is graded.
Push and check CI
Commit and push all your work.
git add --all
git commit -m "Finished the project"
git push
Open your repository on GitHub, click the Actions tab, then Continuous Integration (CI), and confirm that the run for your last push is green. If it is not, open the run, read the output, and fix the problem.
Create the submission report
- In the Actions tab click Create Submission Report Via GitHub Action.
- Click Run workflow and run it on the
masterbranch. - Wait for the run to finish and then refresh your repository. You will now have a file named
submission-report.docxthat contains your README, the build output, the test results, the coverage report, the Address Sanitizer report, and all your code. - The workflow added a commit to your repository, so run
git pullin your Codespace (or wherever you cloned the repository) before you make any more changes. If you skip this, your next push will be rejected.
DANGER
Do NOT edit the generated report. The report ends with a hash of its contents and any changes will be reported as academic dishonesty. If something in the report is wrong, fix your code, push, and run the workflow again.
GitHub Actions is down
If GitHub Actions is down, or the workflow hangs for more than 5 minutes, you can generate the report on Onyx instead. Follow the steps in docs/onyx.md in your repository, which install gcovr and run scripts/create-submission-report.sh.
Submitting
Download submission-report.docx from GitHub and submit it to Canvas. You can view your own submission in Canvas, so open it and make sure everything looks right. Your grade will be updated after the due date (and late window) has passed.