Project 7 - Extra Credit Project

In this project, you are tasked with building your own Linux kernel with a brand new system call compiled into it, and then calling it from a user space program.
Learning Outcomes
- 2.2 Explore the system call interface
- 2.3 Show an understanding of the difference between user and kernel space
Grading Rubric
Make sure and review the class grading rubric so you know how your project will be graded.
Overview
This project is extra credit and can be used to replace a missed project or boost your grade. You will need to attend office hours to get help with the project.
Older textbooks and blog posts show how to add a system call from a loadable kernel module by patching the system call table at runtime. That does not work on a modern kernel. The system call table is no longer exported to modules and it lives in read-only memory, so the only supported way to add a system call is to compile it into the kernel itself. That is what we will do.
You will need a Linux machine that you are allowed to break. A virtual machine or a cloud instance is perfect. Do NOT use the machine that you need to finish your other classes. If you use AWS, EC2 instances built on the Nitro system have a serial console, so you can watch your kernel boot and fix problems even when the network never comes up. This is a fantastic opportunity to learn how to leverage the cloud to do some low-level debugging!
WARNING
The steps below are for Fedora 44 or newer on an x86_64 machine. Other distributions have the same tools under different package names. A full kernel build takes a long time and needs about 20GB of free disk space, so start early.
Task 1 - Setup
Follow the steps below to get your repository all set up and ready to use. The steps below show you how to use and set up GitHub Codespaces. You are not required to use Codespaces. All the steps below can be completed on Onyx (the CS lab machines) or on your personal machine if you prefer.
Create your repository from the template
The starter repository is a GitHub template, so you make your own copy of it instead of forking it.
- Open the starter repository: https://github.com/shanep/makefile-project-starter
- Click the green Use this template button and choose Create a new repository.
- Pick your personal GitHub account as the owner and name the repository cs452-p7.
- Click Create repository.
Your new repository is not a fork, so it has no upstream remote. That is on purpose: everything you need is already in your copy.
Start a new Codespace
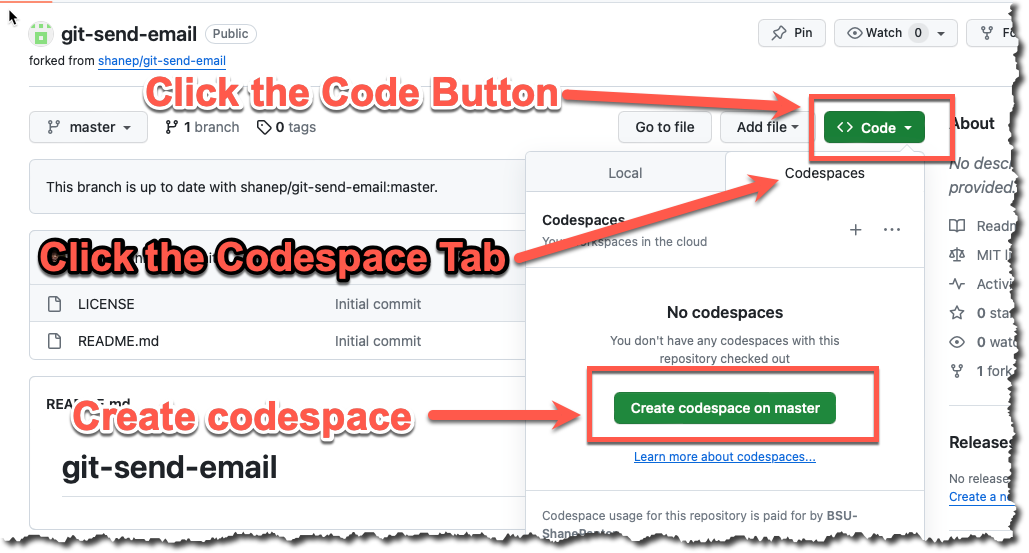
We will use GitHub Codespaces to do most of our coding. Codespaces is just VS Code in the cloud. This makes it really easy to set up a developer environment and code from any computer that has a browser and internet connection! From your new repository click Code, then the Codespaces tab, then Create codespace on master.
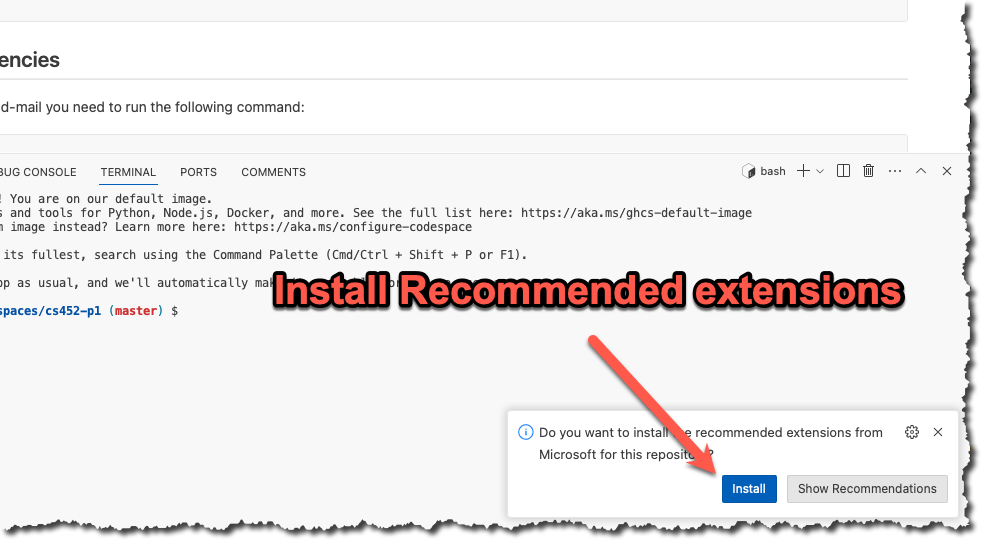
If you are asked to install recommended extensions, click "install". You may not be asked to install extensions if you are already syncing your account.
INFO
If you work on Onyx or your own machine instead, clone your repository with git clone and make sure you have gcc (or clang), make, and gcovr installed. The Codespace comes with all of these. The file docs/onyx.md in your repository has notes on using Onyx.
Get to know the starter
Here is what you get in the starter repository.
src/main.c- themainfunction for the executablesrc/lab.handsrc/lab.c- the library code that both the executable and the tests usetests/lab-test.c- your unit tests, written with the Unity test frameworktests/harness/- the Unity framework itself, don't edit these filesREADME.md- you will fill this out before you submitscripts/create-submission-report.shand.github/workflows/- continuous integration and the submission report
The Makefile builds every C file in src/ and tests/. The test build defines TEST, and src/main.c uses that to rename its main function so it does not clash with the main in tests/lab-test.c. Keep these lines at the top of src/main.c in every project.
#ifdef TEST
#define main main_exclude
#endif
These are the make targets you will use the most. Run make help to see them all.
| Command | What it does |
|---|---|
make all | Builds all four versions of the project listed below |
make check | Runs the unit tests in build/tests/myapp_t |
make leak | Runs the debug executable with Address Sanitizer leak checking on |
make leak-test | Runs the unit tests with Address Sanitizer leak checking on |
make report | Runs the unit tests and creates a code coverage report in build/report |
make clean | Deletes the build directory |
make all creates four programs.
build/release/myapp- the optimized executable, compiled with all the warning flagsbuild/debug/myapp_d- the executable compiled with Address Sanitizerbuild/tests/myapp_t- the unit tests compiled for code coveragebuild/debug-test/myapp_td- the unit tests compiled with Address Sanitizer
If there is no src/main.c then make all skips the executable and only builds the tests. That is how the projects that are 100% unit tests work.
WARNING
make check, make leak, make leak-test, and make report run whatever is already in build/. They do not recompile your code. Run make all after every change or you will be testing old code. Also, make all prints "Builds completed" even when one of the builds failed, so scroll up and read the output.
Task 2 - Build the kernel
Here are the steps to build and install the kernel to make sure everything is working correctly before you change anything.
Install all the required dependencies and build tools as described in the minimal requirements in the kernel documentation. These tools will be in different packages depending on your distribution. For Fedora, you can run the following command:
bashsudo dnf install -y git gcc make flex bison perl bc elfutils-libelf-devel openssl openssl-devel dwarves llvm clang lldMake a new directory to clone the kernel source into
bashmkdir -p ~/kernel && cd ~/kernelClone Linus's tree from git.kernel.org. The
--depth 1flag skips the history, which saves a lot of time and disk space.bashgit clone --depth 1 https://git.kernel.org/pub/scm/linux/kernel/git/torvalds/linux.git cd linuxGenerate a configuration file from the kernel you are running right now. The
localmodconfigtarget starts from your current configuration and turns off every module that is not loaded, so the build is much faster. It will ask about options that are new since your kernel was built, piping inyes ""takes the default answer for each one. The last command adds-cs452to the name of your kernel so you can tell it apart from the stock kernel.bashyes "" | make localmodconfig ./scripts/config --set-str LOCALVERSION "-cs452"Build and install the kernel and its modules.
bashmake -j"$(nproc)" sudo make modules_install sudo make installReboot, pick your new kernel in the boot menu if it is not the default, and confirm that you are running it.
bashuname -rThe version that is printed should contain
-cs452. A kernel built from a git checkout that is not on a release tag gets a+on the end, so something like6.18.0-rc3-cs452+is fine. If your new kernel does not boot, reboot into the stock Fedora kernel, which is still installed, and figure out what went wrong.
Task 3 - Add a system call
Now that you know you can build and boot your own kernel we can add a new system call named cs452_hello. It takes an integer, prints a message to the kernel log, and returns the integer plus one.
Add the system call to the bottom of
kernel/sys.c. TheSYSCALL_DEFINE1macro creates a system call that takes 1 argument.cSYSCALL_DEFINE1(cs452_hello, int, number) { pr_info("cs452_hello called by pid %d with %d\n", task_pid_nr(current), number); return number + 1; }Add the prototype to
include/linux/syscalls.h, next to the othersys_prototypes.casmlinkage long sys_cs452_hello(int number);Add your system call to the x86_64 system call table in
arch/x86/entry/syscalls/syscall_64.tbl. Find the lastcommonentry before the x32 entries that start at 512 and add a new line with the next unused number. Write that number down. You will need it in the next task. For example, if the last entry was 470 your line would look like this:text471 common cs452_hello sys_cs452_helloRepeat steps 5 and 6 from Task 2 to build, install, and boot your new kernel.
Task 4 - Call it from user space
There is no C library wrapper for a system call that you just made up, so you will call it with the generic syscall function. Clone the repository you created in Task 1 onto the machine running your kernel, delete the get_greeting function from src/lab.c and its test from tests/lab-test.c, and replace src/main.c with a program that does the following. Keep the #ifdef TEST lines at the top of src/main.c.
- Calls
syscallwith your system call number and an integer - Prints the return value
- Prints an error message with
perrorifsyscallreturns -1
#include <stdio.h>
#include <unistd.h>
#include <sys/syscall.h>

// Change this to the number you picked in Task 3
#define SYS_cs452_hello 471
Run your program on your new kernel and then run sudo dmesg | tail to see the message that your system call printed to the kernel log. Then reboot into the stock Fedora kernel and run your program again. You should see syscall fail with the error Function not implemented (ENOSYS), because the stock kernel has no idea what your system call number means.
Task 5 - Document your work
Fill out the README.md in your repository and add a new section named ## Kernel Changes that includes the following.
- The output of
git difffrom your kernel source directory - The output of
uname -ron your new kernel - The output of your program and
sudo dmesg | tailon your new kernel - The output of your program on the stock kernel
- A short explanation of what happens between the call to
syscallin user space and your function running in kernel space, and why the stock kernel returnsENOSYS
Final Task - Submit your code
Now that you have completed all the tasks, the only thing left to do is to create a submission report and upload it to Canvas so you can receive a grade for all your hard work.
Update your README
Open up README.md and fill in every section.
- Your name, email, and class section at the top
- Known Bugs or Issues - anything that does not work
- Experience - your struggles and breakthroughs with the project
- Analysis - only if the project asks for one, otherwise delete the section
Check your build
Run the same commands that the continuous integration (CI) workflow runs and make sure you get a clean build with no warnings, all tests passing, and no Address Sanitizer errors.
make clean
make all
make check
make leak-test
Then run make report and look at the coverage numbers at the bottom of the output. The grading rubric explains how coverage is graded.
Push and check CI
Commit and push all your work.
git add --all
git commit -m "Finished the project"
git push
Open your repository on GitHub, click the Actions tab, then Continuous Integration (CI), and confirm that the run for your last push is green. If it is not, open the run, read the output, and fix the problem.
Create the submission report
- In the Actions tab click Create Submission Report Via GitHub Action.
- Click Run workflow and run it on the
masterbranch. - Wait for the run to finish and then refresh your repository. You will now have a file named
submission-report.docxthat contains your README, the build output, the test results, the coverage report, the Address Sanitizer report, and all your code. - The workflow added a commit to your repository, so run
git pullin your Codespace (or wherever you cloned the repository) before you make any more changes. If you skip this, your next push will be rejected.
DANGER
Do NOT edit the generated report. The report ends with a hash of its contents and any changes will be reported as academic dishonesty. If something in the report is wrong, fix your code, push, and run the workflow again.
GitHub Actions is down
If GitHub Actions is down, or the workflow hangs for more than 5 minutes, you can generate the report on Onyx instead. Follow the steps in docs/onyx.md in your repository, which install gcovr and run scripts/create-submission-report.sh.
Submitting
Download submission-report.docx from GitHub and submit it to Canvas. You can view your own submission in Canvas, so open it and make sure everything looks right. Your grade will be updated after the due date (and late window) has passed.
Rust for Linux (RFL)
If you want to go even further, the kernel now supports modules written in Rust.