Project 3

Overview
In this project, we will be implementing a simple shell that can start background processes using the examples that were presented in chapter 5.
Learning Outcomes
- 1.2 Use system library code
- 1.3 Use system documentation
- 1.4 Apply computer science theory and software development fundamentals to produce computing-based solutions.
- 2.2 Explore the system call interface
Grading Rubric
Make sure and review the class grading rubric so you know how your project will be graded.
Task 1 - Setup
Follow the steps below to get your repository all set up and ready to use. The steps below show you how to use and set up GitHub Codespaces. You are not required to use Codespaces. All the steps below can be completed on Onyx (the CS lab machines) or on your personal machine if you prefer.
Create your repository from the template
The starter repository is a GitHub template, so you make your own copy of it instead of forking it.
- Open the starter repository: https://github.com/shanep/makefile-project-starter
- Click the green Use this template button and choose Create a new repository.
- Pick your personal GitHub account as the owner and name the repository cs452-p3.
- Click Create repository.
Your new repository is not a fork, so it has no upstream remote. That is on purpose: everything you need is already in your copy.
Start a new Codespace
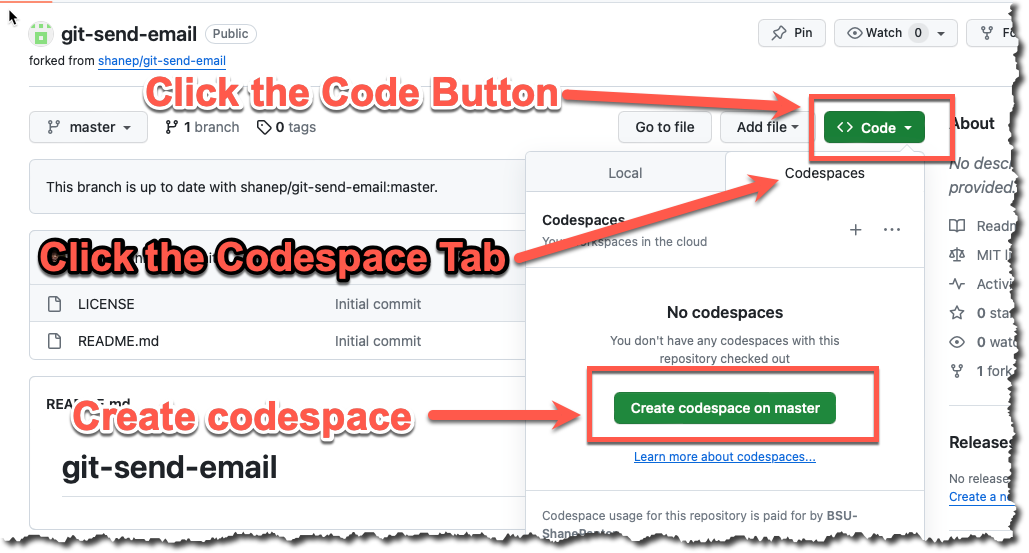
We will use GitHub Codespaces to do most of our coding. Codespaces is just VS Code in the cloud. This makes it really easy to set up a developer environment and code from any computer that has a browser and internet connection! From your new repository click Code, then the Codespaces tab, then Create codespace on master.
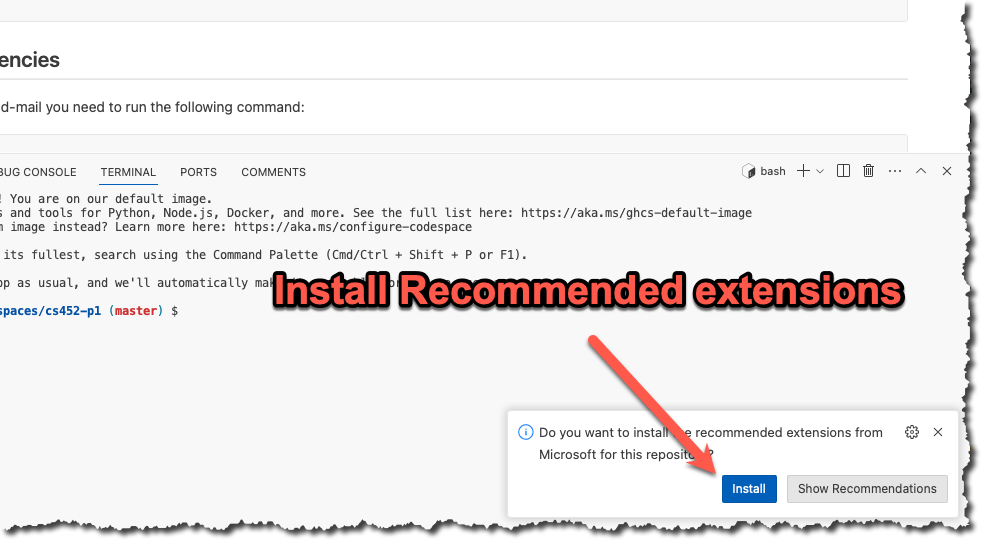
If you are asked to install recommended extensions, click "install". You may not be asked to install extensions if you are already syncing your account.
INFO
If you work on Onyx or your own machine instead, clone your repository with git clone and make sure you have gcc (or clang), make, and gcovr installed. The Codespace comes with all of these. The file docs/onyx.md in your repository has notes on using Onyx.
Get to know the starter
Here is what you get in the starter repository.
src/main.c- themainfunction for the executablesrc/lab.handsrc/lab.c- the library code that both the executable and the tests usetests/lab-test.c- your unit tests, written with the Unity test frameworktests/harness/- the Unity framework itself, don't edit these filesREADME.md- you will fill this out before you submitscripts/create-submission-report.shand.github/workflows/- continuous integration and the submission report
The Makefile builds every C file in src/ and tests/. The test build defines TEST, and src/main.c uses that to rename its main function so it does not clash with the main in tests/lab-test.c. Keep these lines at the top of src/main.c in every project.
#ifdef TEST
#define main main_exclude
#endif
These are the make targets you will use the most. Run make help to see them all.
| Command | What it does |
|---|---|
make all | Builds all four versions of the project listed below |
make check | Runs the unit tests in build/tests/myapp_t |
make leak | Runs the debug executable with Address Sanitizer leak checking on |
make leak-test | Runs the unit tests with Address Sanitizer leak checking on |
make report | Runs the unit tests and creates a code coverage report in build/report |
make clean | Deletes the build directory |
make all creates four programs.
build/release/myapp- the optimized executable, compiled with all the warning flagsbuild/debug/myapp_d- the executable compiled with Address Sanitizerbuild/tests/myapp_t- the unit tests compiled for code coveragebuild/debug-test/myapp_td- the unit tests compiled with Address Sanitizer
If there is no src/main.c then make all skips the executable and only builds the tests. That is how the projects that are 100% unit tests work.
WARNING
make check, make leak, make leak-test, and make report run whatever is already in build/. They do not recompile your code. Run make all after every change or you will be testing old code. Also, make all prints "Builds completed" even when one of the builds failed, so scroll up and read the output.
Task 2 - Prepare your repository
The starter repository is a bare bones template that you will need to update with the starter code below.
src/lab.h
#ifndef LAB_H
#define LAB_H
#include <stdlib.h>
#include <stdbool.h>
#include <sys/types.h>
#include <termios.h>
#include <unistd.h>

#define lab_VERSION_MAJOR 1
#define lab_VERSION_MINOR 0
#define UNUSED(x) (void)(x)

#ifdef __cplusplus
extern "C"
{
#endif

  struct shell
  {
    int shell_is_interactive;
    pid_t shell_pgid;
    struct termios shell_tmodes;
    int shell_terminal;
    char *prompt;
  };


  /**
   * @brief Get the shell prompt. This function will attempt to load a prompt
   * from the requested environment variable, if the environment variable is
   * not set a default prompt of "shell>" is returned.  This function calls
   * malloc internally and the caller must free the resulting string.
   *
   * @param env The environment variable
   * @return char* The prompt
   */
  char *get_prompt(const char *env);

  /**
   * Changes the current working directory of the shell. Uses the linux system
   * call chdir. With no arguments the user's home directory is used as the
   * directory to change to.
   *
   * @param dir The parsed command (dir[0] is "cd", dir[1] is the directory or NULL)
   * @return  On success, zero is returned.  On error, -1 is returned, and
   * errno is set to indicate the error.
   */
  int change_dir(char **dir);

  /**
   * @brief Convert a line read from the user into a format that will work with
   * execvp. We limit the number of arguments to ARG_MAX loaded from sysconf.
   * This function allocates memory that must be reclaimed with the cmd_free
   * function.
   *
   * @param line The line to process
   *
   * @return The line read in a format suitable for exec
   */
  char **cmd_parse(char const *line);

  /**
   * @brief Free the line that was constructed with cmd_parse
   *
   * @param line the line to free
   */
  void cmd_free(char ** line);

  /**
   * @brief Trim the whitespace from the start and end of a string.
   * For example "   ls -a   " becomes "ls -a". This function modifies
   * the argument line so that all printable chars are moved to the
   * front of the string
   *
   * @param line The line to trim
   * @return The new line with no whitespace
   */
  char *trim_white(char *line);


  /**
   * @brief Takes an argument list and checks if the first argument is a
   * built-in command such as exit, cd, jobs, etc. If the command is a
   * built-in command this function will handle the command and then return
   * true. If the first argument is NOT a built-in command this function will
   * return false.
   *
   * @param sh The shell
   * @param argv The command to check
   * @return True if the command was a built-in command
   */
  bool do_builtin(struct shell *sh, char **argv);

  /**
   * @brief Initialize the shell for use. Allocate all data structures
   * Grab control of the terminal and put the shell in its own
   * process group. NOTE: This function will block until the shell is
   * in its own process group. Attaching a debugger will always cause
   * this function to fail because the debugger maintains control of
   * the subprocess it is debugging.
   *
   * @param sh
   */
  void sh_init(struct shell *sh);

  /**
   * @brief Destroy shell. Free any allocated memory and resources and exit
   * normally.
   *
   * @param sh
   */
  void sh_destroy(struct shell *sh);

  /**
   * @brief Parse command line args from the user when the shell was launched
   *
   * @param argc Number of args
   * @param argv The arg array
   */
  void parse_args(int argc, char **argv);


#ifdef __cplusplus
} // extern "C"
#endif

#endif
src/main.c
#include <stdio.h>
#include <stdlib.h>
#include <readline/readline.h>
#include <readline/history.h>
#include "lab.h"

// The test build compiles this file too, so rename main to keep it from
// clashing with the main function in tests/lab-test.c
#ifdef TEST
#define main main_exclude
#endif

int main(int argc, char *argv[])
{
  parse_args(argc, argv);
  struct shell sh;
  sh_init(&sh);

  char *line;
  using_history();
  while ((line = readline(sh.prompt)))
    {
      // TODO: Replace this echo with the work from Tasks 6 through 10
      printf("%s\n", line);
      add_history(line);
      free(line);
    }
  sh_destroy(&sh);
  return 0;
}
tests/lab-test.c
#include <string.h>
#include "harness/unity.h"
#include "../src/lab.h"


void setUp(void) {
  // set stuff up here
}

void tearDown(void) {
  // clean stuff up here
}


void test_cmd_parse2(void)
{
     //The string we want to parse from the user.
     //foo -v
     char *stng = (char*)malloc(sizeof(char)*7);
     strcpy(stng, "foo -v");
     char **actual = cmd_parse(stng);
     //construct our expected output
     size_t n = sizeof(char*) * 6;
     char **expected = (char**) malloc(sizeof(char*) *6);
     memset(expected,0,n);
     expected[0] = (char*)malloc(sizeof(char)*4);
     expected[1] = (char*)malloc(sizeof(char)*3);
     expected[2] = (char*)NULL;

     strcpy(expected[0], "foo");
     strcpy(expected[1], "-v");
     TEST_ASSERT_EQUAL_STRING(expected[0],actual[0]);
     TEST_ASSERT_EQUAL_STRING(expected[1],actual[1]);
     TEST_ASSERT_FALSE(actual[2]);
     free(expected[0]);
     free(expected[1]);
     free(expected);
     cmd_free(actual);
     free(stng);
}

void test_cmd_parse(void)
{
     char **rval = cmd_parse("ls -a -l");
     TEST_ASSERT_TRUE(rval);
     TEST_ASSERT_EQUAL_STRING("ls", rval[0]);
     TEST_ASSERT_EQUAL_STRING("-a", rval[1]);
     TEST_ASSERT_EQUAL_STRING("-l", rval[2]);
     TEST_ASSERT_EQUAL_STRING(NULL, rval[3]);
     TEST_ASSERT_FALSE(rval[3]);
     cmd_free(rval);
}

void test_trim_white_no_whitespace(void)
{
     char *line = (char*) calloc(10, sizeof(char));
     strncpy(line, "ls -a", 10);
     char *rval = trim_white(line);
     TEST_ASSERT_EQUAL_STRING("ls -a", rval);
     free(line);
}

void test_trim_white_start_whitespace(void)
{
     char *line = (char*) calloc(10, sizeof(char));
     strncpy(line, "  ls -a", 10);
     char *rval = trim_white(line);
     TEST_ASSERT_EQUAL_STRING("ls -a", rval);
     free(line);
}

void test_trim_white_end_whitespace(void)
{
     char *line = (char*) calloc(10, sizeof(char));
     strncpy(line, "ls -a  ", 10);
     char *rval = trim_white(line);
     TEST_ASSERT_EQUAL_STRING("ls -a", rval);
     free(line);
}

void test_trim_white_both_whitespace_single(void)
{
     char *line = (char*) calloc(10, sizeof(char));
     strncpy(line, " ls -a ", 10);
     char *rval = trim_white(line);
     TEST_ASSERT_EQUAL_STRING("ls -a", rval);
     free(line);
}

void test_trim_white_both_whitespace_double(void)
{
     char *line = (char*) calloc(10, sizeof(char));
     strncpy(line, "  ls -a  ", 10);
     char *rval = trim_white(line);
     TEST_ASSERT_EQUAL_STRING("ls -a", rval);
     free(line);
}

void test_trim_white_all_whitespace(void)
{
     char *line = (char*) calloc(10, sizeof(char));
     strncpy(line, "  ", 10);
     char *rval = trim_white(line);
     TEST_ASSERT_EQUAL_STRING("", rval);
     free(line);
}

void test_trim_white_mostly_whitespace(void)
{
     char *line = (char*) calloc(10, sizeof(char));
     strncpy(line, "    a    ", 10);
     char *rval = trim_white(line);
     TEST_ASSERT_EQUAL_STRING("a", rval);
     free(line);
}

void test_get_prompt_default(void)
{
     char *prompt = get_prompt("MY_PROMPT");
     TEST_ASSERT_EQUAL_STRING(prompt, "shell>");
     free(prompt);
}

void test_get_prompt_custom(void)
{
     const char* prmpt = "MY_PROMPT";
     if(setenv(prmpt,"foo>",true)){
          TEST_FAIL();
     }

     char *prompt = get_prompt(prmpt);
     TEST_ASSERT_EQUAL_STRING(prompt, "foo>");
     free(prompt);
     unsetenv(prmpt);
}

void test_ch_dir_home(void)
{
     char *line = (char*) calloc(10, sizeof(char));
     strncpy(line, "cd", 10);
     char **cmd = cmd_parse(line);
     char *expected = getenv("HOME");
     change_dir(cmd);
     char *actual = getcwd(NULL,0);
     TEST_ASSERT_EQUAL_STRING(expected, actual);
     free(line);
     free(actual);
     cmd_free(cmd);
}

void test_ch_dir_root(void)
{
     char *line = (char*) calloc(10, sizeof(char));
     strncpy(line, "cd /", 10);
     char **cmd = cmd_parse(line);
     change_dir(cmd);
     char *actual = getcwd(NULL,0);
     TEST_ASSERT_EQUAL_STRING("/", actual);
     free(line);
     free(actual);
     cmd_free(cmd);
}

int main(void) {
  UNITY_BEGIN();
  RUN_TEST(test_cmd_parse);
  RUN_TEST(test_cmd_parse2);
  RUN_TEST(test_trim_white_no_whitespace);
  RUN_TEST(test_trim_white_start_whitespace);
  RUN_TEST(test_trim_white_end_whitespace);
  RUN_TEST(test_trim_white_both_whitespace_single);
  RUN_TEST(test_trim_white_both_whitespace_double);
  RUN_TEST(test_trim_white_all_whitespace);
  RUN_TEST(test_trim_white_mostly_whitespace);
  RUN_TEST(test_get_prompt_default);
  RUN_TEST(test_get_prompt_custom);
  RUN_TEST(test_ch_dir_home);
  RUN_TEST(test_ch_dir_root);

  return UNITY_END();
}
Delete the get_greeting function in src/lab.c. You will implement the functions from lab.h in that file. The shell uses the GNU Readline library (see Task 4), so open up the Makefile and add the line below right after the commented out #LDFLAGS ?= -pthread line.
LDFLAGS += -lreadlineIf you are working in a Codespace you also need to install the readline development files with the apt-get commands shown in Task 4, or your code will not compile.
The GitHub runners that run your continuous integration and submission report may not have the readline development files installed. Open up .github/workflows/ci.yml and .github/workflows/submission-report.yml and add the step below right before the make all step in each file.
    - name: Install readline
      run: sudo apt-get update && sudo apt-get install -y libreadline-dev
Once you have updated all the starter code let's make your first commit so everything is saved. Open up a terminal and let's make a commit!
git add --all
git commit -m "Added in starter code"
Task 3 - Print Version
Let’s start off simple and just have our shell print off its version. When the shell is started with a command line argument -v, it prints out the version of the project and then quits. You will need to leverage the header file lab.h for the major and minor version. Parse the command line arguments with getopt. The program should exit after printing the version.
Task 4 - User Input
While we could use a function like scanf to get input from the user a much more robust way would be to leverage the GNU Readline library. The GNU Readline library allows a program to control the input line and adds a bunch of cool functions that allow the user to edit the line, use TAB key for filename completion, and the use of up arrow, down arrow, left arrow and right arrow keys to access the history of commands typed in by the user. You will need to include the header files readline/readline.h and readline/history.h to use the readline functions.
#include <readline/readline.h>
#include <readline/history.h>
char *line;
using_history();
while ((line=readline("$"))){
    printf("%s\n",line);
    add_history(line);
    free(line);
}
You need to install both the readline header files and development libraries for the above code to compile and link. All the correct libraries are installed on the lab machines. On Red Hat based machines development packages end in devel. So to get all the readline development packages you would need to install readline-devel as well as readline. On Debian and Ubuntu, which is what Codespaces runs, the development package is named libreadline-dev.
sudo apt-get update
sudo apt-get install -y libreadline-dev
The starter Makefile does not link readline for you, so make sure you added LDFLAGS += -lreadline to the Makefile in Task 2.
The readline documentation is a good starting point on how to use the readline library. Pay close attention to memory ownership. Remember that C does not have a garbage collector.
Task 5 - Custom Prompt
The default prompt for the shell is shell>, which is what the tests expect. However the shell checks for an environment variable MY_PROMPT. If the environment variable is set, then it uses the value as the prompt. The environment variable can be set inline MY_PROMPT="foo>" ./build/release/myapp so you can quickly test your program.
- Use the library function getenv to retrieve environment variables
Task 6 - Built-in Commands
Now that we can get input from users let's add in some built-in commands. These commands need to be handled by the shell itself. You should not create a new process to handle these commands so it is good to implement these before you add in the fork/exec code in a future task.
Exit command
Include a built-in command named exit that terminates the shell normally. Your shell should return a status of 0 when it terminates normally and a non-zero status otherwise. Your shell should also terminate normally on receiving the end of input EOF (Under Linux and bash, this would normally be Ctrl-D for you to test your mini-shell). You are required to clean up any allocated memory before you exit.
Change Directory Command
Include a built-in command named cd to allow a user to change directories. You will need to use the chdir system call. The cd command without any arguments should change the working directory to the user’s home directory. You must first use getenv and if getenv returns NULL your program should fall back to the system call getuid and the library function getpwuid to find out the home directory of the user. Make sure to print an error message if the cd command fails.
History Command
Add a new built-in command to your shell to print out a history of commands entered. You should leverage the history library to accomplish this.
Task 7 - Create a Process
Our shell will create a new process and wait for it to complete. The shell accepts one command per line with arguments. Use the function sysconf with _SC_ARG_MAX to get ARG_MAX, the maximum length in bytes of the arguments plus the environment that the exec family of functions can accept. ARG_MAX is a byte limit, not a count, so it is a safe upper bound on the number of arguments your shell needs to handle (each argument takes at least 2 bytes, a character and the '\0'). The shell will parse each line that is entered and then attempt to execute the process using the execvp library function, which calls the execve system call. The execvp function performs a search for the command using the PATH environment variable. This will simplify your programming since you do not have to search for the location of the command.
For our simple shell you can assume that all command line arguments will be separated by spaces. You don’t have to worry about quoted arguments. For example given the command ls -l -a you would parse this string as an array of size 4 with the structure of ls → -l → -a → NULL. The command ls "-l -a" would parse out to be ls → "-l → -a". If you want to write a parsing algorithm that handles quotes like bash more information is available at The Linux Documentation Project.
If the user just presses the Enter key, then the shell displays another prompt. If the user types just spaces and then presses the Enter key, then the shell displays another prompt as this is also an empty command. Empty commands should not cause a segfault or memory leak.
Task 8 - Signals
The shell should ignore the signals listed below:
signal(SIGINT, SIG_IGN);
signal(SIGQUIT, SIG_IGN);
signal(SIGTSTP, SIG_IGN);
signal(SIGTTIN, SIG_IGN);
signal(SIGTTOU, SIG_IGN);
In the child process don’t forget to set these signals back to default!
/*This is the child process*/
pid_t child = getpid();
setpgid(child, child);
if (foreground)
    tcsetpgrp(sh.shell_terminal, child);
signal (SIGINT, SIG_DFL);
signal (SIGQUIT, SIG_DFL);
signal (SIGTSTP, SIG_DFL);
signal (SIGTTIN, SIG_DFL);
signal (SIGTTOU, SIG_DFL);
execvp(cmd[0], cmd);
fprintf(stderr, "exec failed\n");
_exit(EXIT_FAILURE);
Only give the terminal to the child when it is a foreground job (see Task 9). If execvp returns then it failed, so the child must exit or you will have two copies of your shell running.
If there is no process being executed, then the shell should just display a new prompt and ignore any input on the current line. You will need to use the tcgetpgrp and tcsetpgrp functions to get and set the foreground process group of the controlling terminal and the signal system call to ignore and enable signals.
The glibc manual links below describe a full job control shell. You are not required to implement a job control shell to the same level of functionality. You can use the documentation linked below as a guide but be aware your shell will probably fail to function correctly if you just copy and paste the code examples without understanding what they do. You are free to use code from the manual as long as you take the time to understand what it does and why.
Task 9 - Background Processes
Your shell can start a process in the background if an ampersand (&) is the last character on the line. For each background process that is started, it prints an id and the process id (pid) of the background process and the full command that was given by the user. After starting a background process, the shell comes back with a prompt ready to accept a new command from the user without waiting for the background process to finish. The user should not be required to separate the & from the command by a space. For example, the commands date & and date& are both valid. Additionally, blanks after the ampersand are valid as well.
The mini shell should keep track of processes running in the background. Whenever the user starts a process in the background, it should assign and display the job number, the associated process id and the full command (including the ampersand).
[n] process-id command
It should also display an informative message when a background job is done. That is, every time the user presses the ENTER key, the shell should report all the background processes that have finished since the last time the user pressed the ENTER key. The message should be of the following form:
[n] Done command
Where n is the job number and command is the actual command that was typed. You should use the WNOHANG option with the waitpid system call to determine the status of background processes.
Task 10 - Jobs command
Add a new built-in command called jobs, that prints out all the background commands that are running or are done but whose status has not yet been reported. Here is a sample output:
[1] 3451 Running sleep 100 &
[2] Done    sleep 5 &
[3] 3452 Running gargantuan &
The first job should be assigned the job number 1. Each additional job should be assigned one higher number. If lower numbered jobs finish, then we do not reuse them unless all jobs numbered higher than that number have also finished.
Additional Resources
Below are some links to some awesome documentation for writing a job control shell which you should read through before you start coding as it will help you understand the problem space. However, be aware that the libc manual describes a much more complex shell than what we are building so don’t panic if you don’t understand everything in the manual.
Keep in mind that some of the code samples provided in the libc manual are written in C89 so may look a bit strange if you are used to only reading C99 code.
Final Task - Submit your code
Now that you have completed all the tasks, the only thing left to do is to create a submission report and upload it to Canvas so you can receive a grade for all your hard work.
Update your README
Open up README.md and fill in every section.
- Your name, email, and class section at the top
- Known Bugs or Issues - anything that does not work
- Experience - your struggles and breakthroughs with the project
- Analysis - only if the project asks for one, otherwise delete the section
Check your build
Run the same commands that the continuous integration (CI) workflow runs and make sure you get a clean build with no warnings, all tests passing, and no Address Sanitizer errors.
make clean
make all
make check
make leak-test
Then run make report and look at the coverage numbers at the bottom of the output. The grading rubric explains how coverage is graded.
Push and check CI
Commit and push all your work.
git add --all
git commit -m "Finished the project"
git push
Open your repository on GitHub, click the Actions tab, then Continuous Integration (CI), and confirm that the run for your last push is green. If it is not, open the run, read the output, and fix the problem.
Create the submission report
- In the Actions tab click Create Submission Report Via GitHub Action.
- Click Run workflow and run it on the
masterbranch. - Wait for the run to finish and then refresh your repository. You will now have a file named
submission-report.docxthat contains your README, the build output, the test results, the coverage report, the Address Sanitizer report, and all your code. - The workflow added a commit to your repository, so run
git pullin your Codespace (or wherever you cloned the repository) before you make any more changes. If you skip this, your next push will be rejected.
DANGER
Do NOT edit the generated report. The report ends with a hash of its contents and any changes will be reported as academic dishonesty. If something in the report is wrong, fix your code, push, and run the workflow again.
GitHub Actions is down
If GitHub Actions is down, or the workflow hangs for more than 5 minutes, you can generate the report on Onyx instead. Follow the steps in docs/onyx.md in your repository, which install gcovr and run scripts/create-submission-report.sh.
Submitting
Download submission-report.docx from GitHub and submit it to Canvas. You can view your own submission in Canvas, so open it and make sure everything looks right. Your grade will be updated after the due date (and late window) has passed.