Project 1

Overview
This project is intended to serve as an introduction to the project template, build tools, and process to complete projects during this semester. This project demonstrates the only officially supported tools and programming languages.
We are going to review the following topics:
- How to set up your project with the provided starter code
- How to use the build system
- How to write unit tests
- Demonstrate address sanitizer output
- How to use the debugger
- Submitting the project with a submission report
Learning Outcomes
- 5.1 Compile your code with a build system
- 5.2 Use a unit test framework
- 5.3 Use a professional version control system (git)
- 5.4 Explore compiling and running code on at least 2 different systems (Codespaces and Onyx)
- 5.5 Explore how to set up a continuous integration and testing project
Grading Rubric
Make sure and review the class grading rubric so you know how your project will be graded.
Task 1 - Setup
Follow the steps below to get your repository all set up and ready to use. The steps below show you how to use and set up GitHub Codespaces. You are not required to use Codespaces. All the steps below can be completed on Onyx (the CS lab machines) or on your personal machine if you prefer.
Create your repository from the template
The starter repository is a GitHub template, so you make your own copy of it instead of forking it.
- Open the starter repository: https://github.com/shanep/makefile-project-starter
- Click the green Use this template button and choose Create a new repository.
- Pick your personal GitHub account as the owner and name the repository cs452-p1.
- Click Create repository.
Your new repository is not a fork, so it has no upstream remote. That is on purpose: everything you need is already in your copy.
Start a new Codespace
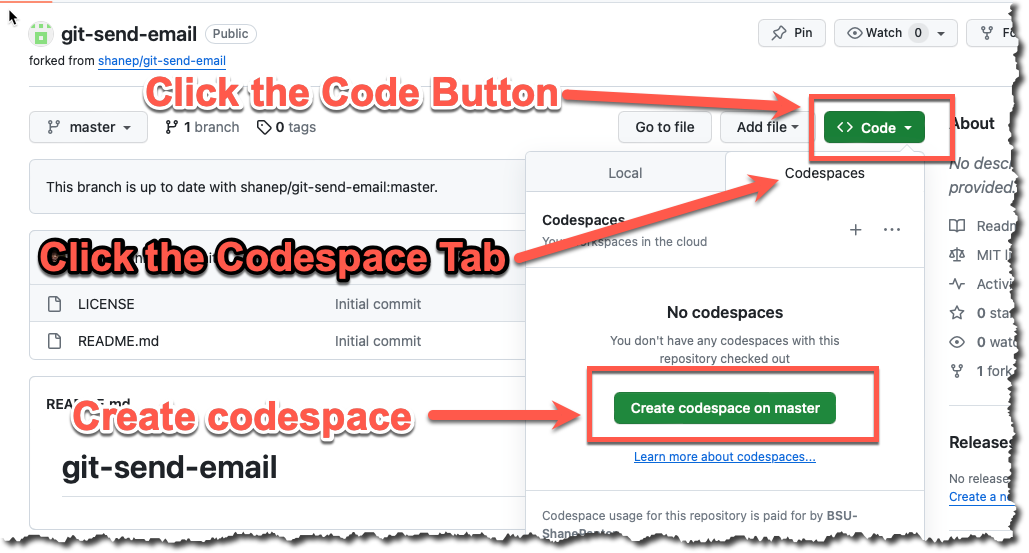
We will use GitHub Codespaces to do most of our coding. Codespaces is just VS Code in the cloud. This makes it really easy to set up a developer environment and code from any computer that has a browser and internet connection! From your new repository click Code, then the Codespaces tab, then Create codespace on master.
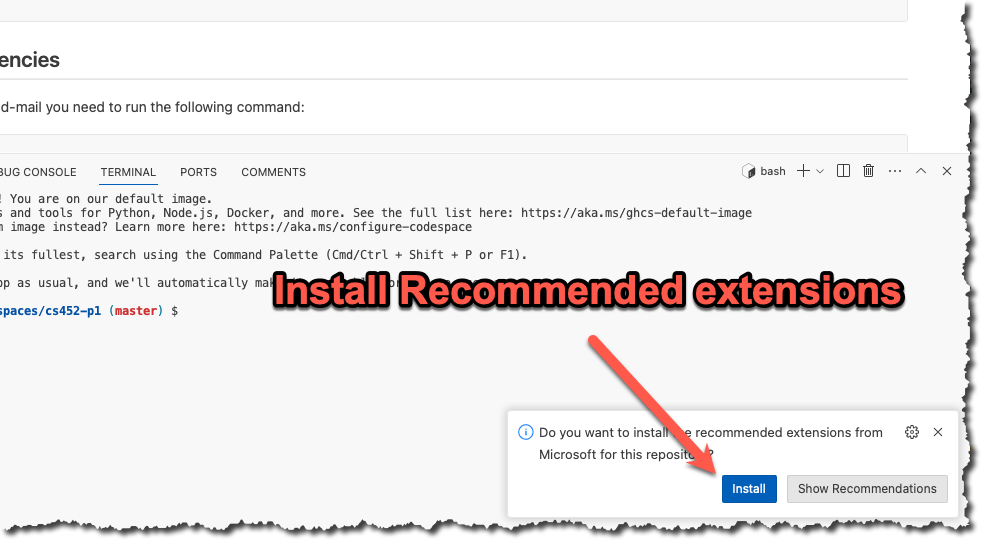
If you are asked to install recommended extensions, click "install". You may not be asked to install extensions if you are already syncing your account.
INFO
If you work on Onyx or your own machine instead, clone your repository with git clone and make sure you have gcc (or clang), make, and gcovr installed. The Codespace comes with all of these. The file docs/onyx.md in your repository has notes on using Onyx.
Get to know the starter
Here is what you get in the starter repository.
src/main.c- themainfunction for the executablesrc/lab.handsrc/lab.c- the library code that both the executable and the tests usetests/lab-test.c- your unit tests, written with the Unity test frameworktests/harness/- the Unity framework itself, don't edit these filesREADME.md- you will fill this out before you submitscripts/create-submission-report.shand.github/workflows/- continuous integration and the submission report
The Makefile builds every C file in src/ and tests/. The test build defines TEST, and src/main.c uses that to rename its main function so it does not clash with the main in tests/lab-test.c. Keep these lines at the top of src/main.c in every project.
#ifdef TEST
#define main main_exclude
#endif
These are the make targets you will use the most. Run make help to see them all.
| Command | What it does |
|---|---|
make all | Builds all four versions of the project listed below |
make check | Runs the unit tests in build/tests/myapp_t |
make leak | Runs the debug executable with Address Sanitizer leak checking on |
make leak-test | Runs the unit tests with Address Sanitizer leak checking on |
make report | Runs the unit tests and creates a code coverage report in build/report |
make clean | Deletes the build directory |
make all creates four programs.
build/release/myapp- the optimized executable, compiled with all the warning flagsbuild/debug/myapp_d- the executable compiled with Address Sanitizerbuild/tests/myapp_t- the unit tests compiled for code coveragebuild/debug-test/myapp_td- the unit tests compiled with Address Sanitizer
If there is no src/main.c then make all skips the executable and only builds the tests. That is how the projects that are 100% unit tests work.
WARNING
make check, make leak, make leak-test, and make report run whatever is already in build/. They do not recompile your code. Run make all after every change or you will be testing old code. Also, make all prints "Builds completed" even when one of the builds failed, so scroll up and read the output.
Task 2 - Prepare your repository
The starter repository is a bare bones template that you will need to update with the starter code below. Replace the contents of each file with the code shown.
src/lab.h
#ifndef LAB_H
#define LAB_H
#include <stdlib.h>
#include <stdbool.h>

#define MAX_VERSION_STRING 10
#define lab_VERSION_MAJOR 1
#define lab_VERSION_MINOR 0
#define UNUSED(x) (void)(x)

#ifdef __cplusplus
extern "C"
{
#endif

  /**
   * @brief Returns a string containing the version of the library.
   * This string has been allocated using malloc and must be freed
   * by the caller.
   *
   * @return char* The version string
   */
  char *getVersion(void);

  /**
   * @brief This function causes a segfault to demo Address Sanitizer
   *
   */
  int segfault(void);

  /**
   * @brief This function causes an array out of bounds error to
   * demo Address Sanitizer
   *
   */
  void outOfBounds(void);

#ifdef __cplusplus
} // extern "C"
#endif

#endif
src/lab.c
#include <stdio.h>
#include <string.h>
#include <stdlib.h>
#include "lab.h"

char *getVersion(void)
{
  char *version = (char *)malloc(MAX_VERSION_STRING);
  snprintf(version, MAX_VERSION_STRING, "%d.%d", lab_VERSION_MAJOR, lab_VERSION_MINOR);
  return version;
}

int segfault(void)
{
  // add volatile because clang will optimize out the segfault
  volatile int *foo = NULL;
  int bar = *foo;
  return bar;
}

void outOfBounds(void)
{
  int arr[5] = {0, 1, 2, 3, 4};
  int i = 0;
  for (i = 0; i < 6; i++)
    {
      arr[i] = i;
    }
  UNUSED(arr);
}
src/main.c
#include <stdio.h>
#include <string.h>
#include <stdlib.h>
#include "lab.h"

// The test build compiles this file too, so rename main to keep it from
// clashing with the main function in tests/lab-test.c
#ifdef TEST
#define main main_exclude
#endif

int main(void)
{
  char *line = NULL;
  size_t len = 0;
  char *version = getVersion();
  printf("What is your name? ");
  if (getline(&line, &len, stdin) == -1)
    {
      fprintf(stderr, "No name entered\n");
      free(line);
      free(version);
      return 1;
    }
  line[strcspn(line, "\n")] = '\0';
  printf("Hello %s! This is the starter template version: %s\n", line, version);
  return 0;
}
tests/lab-test.c
#include "harness/unity.h"
#include "../src/lab.h"


void setUp(void) {
    // set stuff up here
}

void tearDown(void) {
    // clean stuff up here
}

void test_leak(void) {
  char *version = getVersion();
  TEST_ASSERT_EQUAL_STRING("1.0", version);
}

void test_segfault(void) {
  segfault();
}

void test_bounds(void){
  outOfBounds();
}

int main(void) {
    UNITY_BEGIN();
    RUN_TEST(test_leak);
    RUN_TEST(test_segfault);
    RUN_TEST(test_bounds);
    return UNITY_END();
}
Once you have updated all the starter code let's make your first commit so everything is saved. Open up a terminal and let's make a commit!
git add --all
git commit -m "Added in starter code"
git push
Task 3 - Compile
You can compile the project by typing make all in the terminal. This builds all four versions of the project. For now we only care about the debug version, build/debug/myapp_d, which is compiled with Address Sanitizer turned on. Once you have successfully compiled the project you can run the executable like this (the output below has been trimmed):
@BSU-ShanePanter ➜ /workspaces/cs452-p1 (master) $ make all
...
Builds completed. You can run the application with: ./build/release/myapp
You can run the debug build with: ./build/debug/myapp_d
You can run the test build with: ./build/tests/myapp_t
You can run the debug-test build with: ./build/debug-test/myapp_td
@BSU-ShanePanter ➜ /workspaces/cs452-p1 (master) $ ./build/debug/myapp_d
What is your name? shane
Hello shane! This is the starter template version: 1.0

=================================================================
==8990==ERROR: LeakSanitizer: detected memory leaks

Direct leak of 120 byte(s) in 1 object(s) allocated from:
    #0 0x7f0014924808 in malloc
    #1 0x7f00145f1c2a in getdelim
    #2 0x5646c7cd6660 in main src/main.c:18

Direct leak of 10 byte(s) in 1 object(s) allocated from:
    #0 0x7f0014924808 in malloc
    #1 0x5646c7cd62be in getVersion src/lab.c:8
    #2 0x5646c7cd65f1 in main src/main.c:16

SUMMARY: AddressSanitizer: 130 byte(s) leaked in 2 allocation(s).
Well that is not good! We have a memory leak in the starter code that we need to fix. Address Sanitizer tells us exactly where the leaked memory was allocated: getline allocated a buffer for line on line 18 of src/main.c, and getVersion allocated the version string. Open up the file src/main.c and free the line and version variables after the last printf call.
free(line);
free(version);
Now compile and run the program again to see the fix. You only need the debug build, so you can run make debug instead of make all.
@BSU-ShanePanter ➜ /workspaces/cs452-p1 (master) $ make debug
make BUILD=debug
make[1]: Entering directory '/workspaces/cs452-p1'
mkdir -p build/debug
cc -g -O0 -DDEBUG -fno-omit-frame-pointer -fsanitize=address -c src/main.c -o build/debug/main.c.o
cc -g -O0 -DDEBUG -fno-omit-frame-pointer -fsanitize=address build/debug/lab.c.o build/debug/main.c.o -o build/debug/myapp_d -fsanitize=address
make[1]: Leaving directory '/workspaces/cs452-p1'
@BSU-ShanePanter ➜ /workspaces/cs452-p1 (master) $ ./build/debug/myapp_d
What is your name? shane
Hello shane! This is the starter template version: 1.0
Let's commit our work so far.
git add src/main.c
git commit -m "Fixed leak in main.c"
git push
So far so good. We now have a working executable that is bug free. Let's move on to the tests.
Task 4 - Test
The starter template is set up with the Unity test harness that will make it easy to write and run tests. There are two ways to run the tests.
make checkrunsbuild/tests/myapp_t, which is compiled to measure code coveragemake leak-testrunsbuild/debug-test/myapp_td, which is compiled with Address Sanitizer
Both of them run the tests that are already built, so run make all first. Let's start with make check.
@BSU-ShanePanter ➜ /workspaces/cs452-p1 (master) $ make check
tests/lab-test.c:28:test_leak:PASS
/bin/bash: line 1: 9120 Segmentation fault      ./build/tests/myapp_t
make: *** [Makefile:125: check] Error 139
The tests crashed before they could finish. Fix the crash, then run make all and make check again. The tests may all pass now, but don't celebrate yet! The coverage build can't see most memory errors, so now run the same tests with Address Sanitizer. The output below has been trimmed.
@BSU-ShanePanter ➜ /workspaces/cs452-p1 (master) $ make leak-test
tests/lab-test.c:28:test_leak:PASS
tests/lab-test.c:29:test_segfault:PASS
=================================================================
==9245==ERROR: AddressSanitizer: stack-buffer-overflow on address 0x7ffd4e2b1a54 at pc 0x55f3c1a2b4f1 bp 0x7ffd4e2b1a10 sp 0x7ffd4e2b1a08
WRITE of size 4 at 0x7ffd4e2b1a54 thread T0
    #0 0x55f3c1a2b4f0 in outOfBounds src/lab.c:27
    #1 0x55f3c1a2c9a1 in test_bounds tests/lab-test.c:23
...
SUMMARY: AddressSanitizer: stack-buffer-overflow src/lab.c:27 in outOfBounds
This approach will allow us to write high quality code and catch bugs early so when we are working on larger projects we can focus on the project requirements instead of the low level details of memory errors. Address Sanitizer can detect the following types of bugs:
- Out-of-bounds accesses to heap, stack and globals
- Use-after-free
- Use-after-return (enable at runtime with
ASAN_OPTIONS=detect_stack_use_after_return=1) - Use-after-scope
- Double-free, invalid free
- Memory leaks (Linux only)
You need to fix all the issues in the project before proceeding to the next task. There should be no build warnings, no disabled tests, and both make check and make leak-test should pass with no Address Sanitizer errors.
INFO
This is just a warm-up project. The functions that are failing can be fixed in any number of ways. I am not looking for any specific fix, I am just looking for you to make the tests pass instead.
Fix all the tests in the file tests/lab-test.c to pass just like we did in the previous step. Once you have all the tests passing make sure and do a git add, git commit and git push just like the previous task.
Once you have fixed all the broken tests you should see a clean test run with all tests passing.
@BSU-ShanePanter ➜ /workspaces/cs452-p1 (master) $ make leak-test
tests/lab-test.c:28:test_leak:PASS
tests/lab-test.c:29:test_segfault:PASS
tests/lab-test.c:30:test_bounds:PASS

-----------------------
3 Tests 0 Failures 0 Ignored
OK
Finally, run make report to see how much of your code the tests cover. The summary is printed in the terminal and a detailed report is saved in build/report/html/coverage_report.html.
Task 5 - Run the debugger
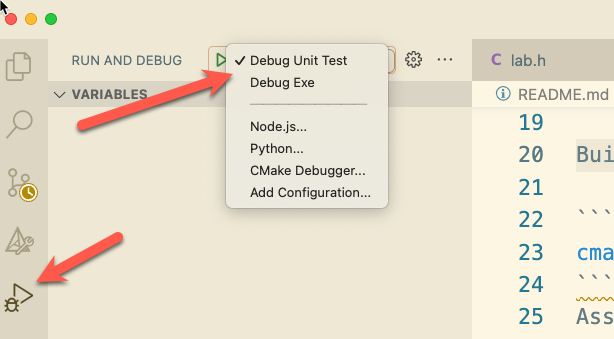
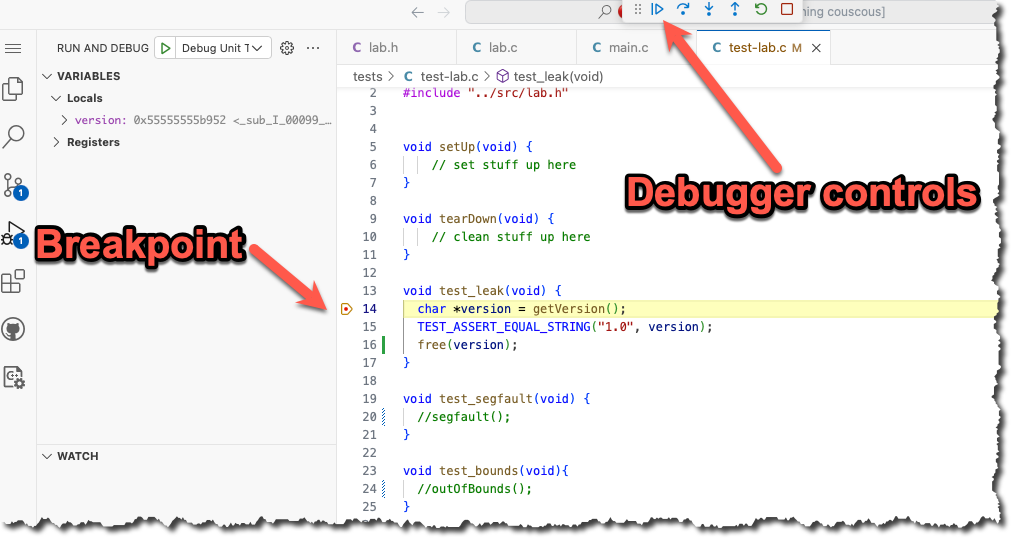
This starter template should work out of the box for both unit tests and the executable. The debugger runs the debug builds, so run make all first. Open the debugger view in VS Code and set a breakpoint in the main function and a breakpoint in one of the functions in the tests/lab-test.c file. Run the Debug Exe configuration and then the Debug Tests configuration and verify that the debugger stops at the breakpoints. You will need to run the debugger separately for the unit tests and the executable.
DANGER
While this task is not graded it is important that you are able to use the debugger, so don't skip this task. Make sure you can use the debugger now instead of at 11:45pm the night the project is due and there is no one around to help you.
Final Task - Submit your code
Now that you have completed all the tasks, the only thing left to do is to create a submission report and upload it to Canvas so you can receive a grade for all your hard work.
Update your README
Open up README.md and fill in every section.
- Your name, email, and class section at the top
- Known Bugs or Issues - anything that does not work
- Experience - your struggles and breakthroughs with the project
- Analysis - only if the project asks for one, otherwise delete the section
Check your build
Run the same commands that the continuous integration (CI) workflow runs and make sure you get a clean build with no warnings, all tests passing, and no Address Sanitizer errors.
make clean
make all
make check
make leak-test
Then run make report and look at the coverage numbers at the bottom of the output. The grading rubric explains how coverage is graded.
Push and check CI
Commit and push all your work.
git add --all
git commit -m "Finished the project"
git push
Open your repository on GitHub, click the Actions tab, then Continuous Integration (CI), and confirm that the run for your last push is green. If it is not, open the run, read the output, and fix the problem.
Create the submission report
- In the Actions tab click Create Submission Report Via GitHub Action.
- Click Run workflow and run it on the
masterbranch. - Wait for the run to finish and then refresh your repository. You will now have a file named
submission-report.docxthat contains your README, the build output, the test results, the coverage report, the Address Sanitizer report, and all your code. - The workflow added a commit to your repository, so run
git pullin your Codespace (or wherever you cloned the repository) before you make any more changes. If you skip this, your next push will be rejected.
DANGER
Do NOT edit the generated report. The report ends with a hash of its contents and any changes will be reported as academic dishonesty. If something in the report is wrong, fix your code, push, and run the workflow again.
GitHub Actions is down
If GitHub Actions is down, or the workflow hangs for more than 5 minutes, you can generate the report on Onyx instead. Follow the steps in docs/onyx.md in your repository, which install gcovr and run scripts/create-submission-report.sh.
Submitting
Download submission-report.docx from GitHub and submit it to Canvas. You can view your own submission in Canvas, so open it and make sure everything looks right. Your grade will be updated after the due date (and late window) has passed.