07.01 - Setup
Week 7 · 50 points
Overview
This assignment is a simple assignment to confirm you can access your sandbox AWS account and create an EC2 VM. In the AWS console you will see a lot of Access Denied for certain features. That is fine and expected due to the limitations on the student account. You can access everything that is needed for this class.
Example app: https://github.com/shanep/simple-full-stack
NOTE: Your AWS account should be activated by the time you start on this assignment. If it is not, please email me ASAP 😃
Tasks
Task 1 - AWS Log in
- Instructions for how to get your AWS account: https://docs.google.com/document/d/13fxRl74VXFLauW7WmduWOadu2FO6c5JrGtohanua0wI/edit?usp=sharing
- You will log in with your Boise State credentials to access AWS Innovation Sandbox
- You will have to click through a few screens to log in. Eventually you should see the AWS console.
- IMPORTANT: In the final screenshot make sure you are in United States (Oregon) or us-west-2. Your account will NOT work in any other region!
Task 2 - Launch a VM with EC2
- In the Search bar shown below in the console screenshot, search for EC2
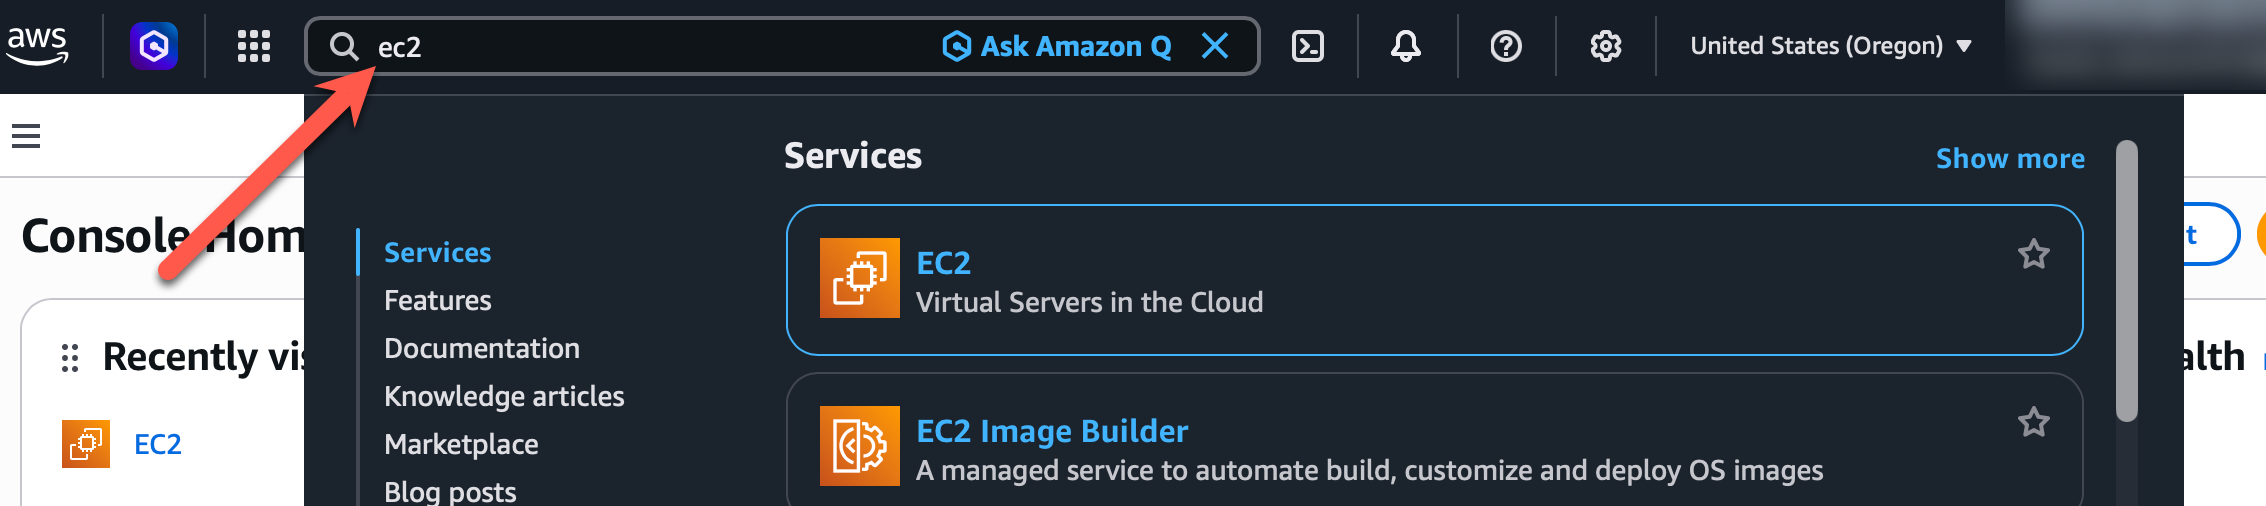
- Create a new EC2 instance as follows:
- Click the big orange "Launch Instance" button shown on the EC2 dashboard
- Name the server as follows: yourname-cs408
- Select Ubuntu from the Quick Start Application and OS Images, then choose Ubuntu Server 26.04 LTS in the Amazon Machine Image (AMI) list. The example app's scripts are tested on it, and its login user is
ubuntu, which the later assignments use. (You may choose a different Linux distribution, but then you will have to adapt the scripts and the login user yourself.) - Keep the default Architecture, 64-bit (x86)
- Set the Instance type to t2.micro
- Create a new Key Pair (login) with key pair type RSA and private key file format .pem (not .ppk). Save the downloaded key in a safe place, because you will need it to ssh into your machine (just like you do on onyx)
- This should download a key to your downloads folder which you will use later.
- In the Network Settings section make sure and click create a new default VPC if there is a warning banner displayed
- Make sure and check the boxes for the following:
- Allow SSH traffic from
- Allow HTTPS traffic from the internet (nothing uses HTTPS yet; this is for later)
- Allow HTTP traffic from the internet
- Keep all other settings as default.
- Launch the instance and wait for it to come online
- Access your EC2 server via SSH
- In the left navigation on the AWS console click Instances and you should see your new instance with an instance state of "Running". If it doesn't say "Running", give it a few minutes to fully come online.
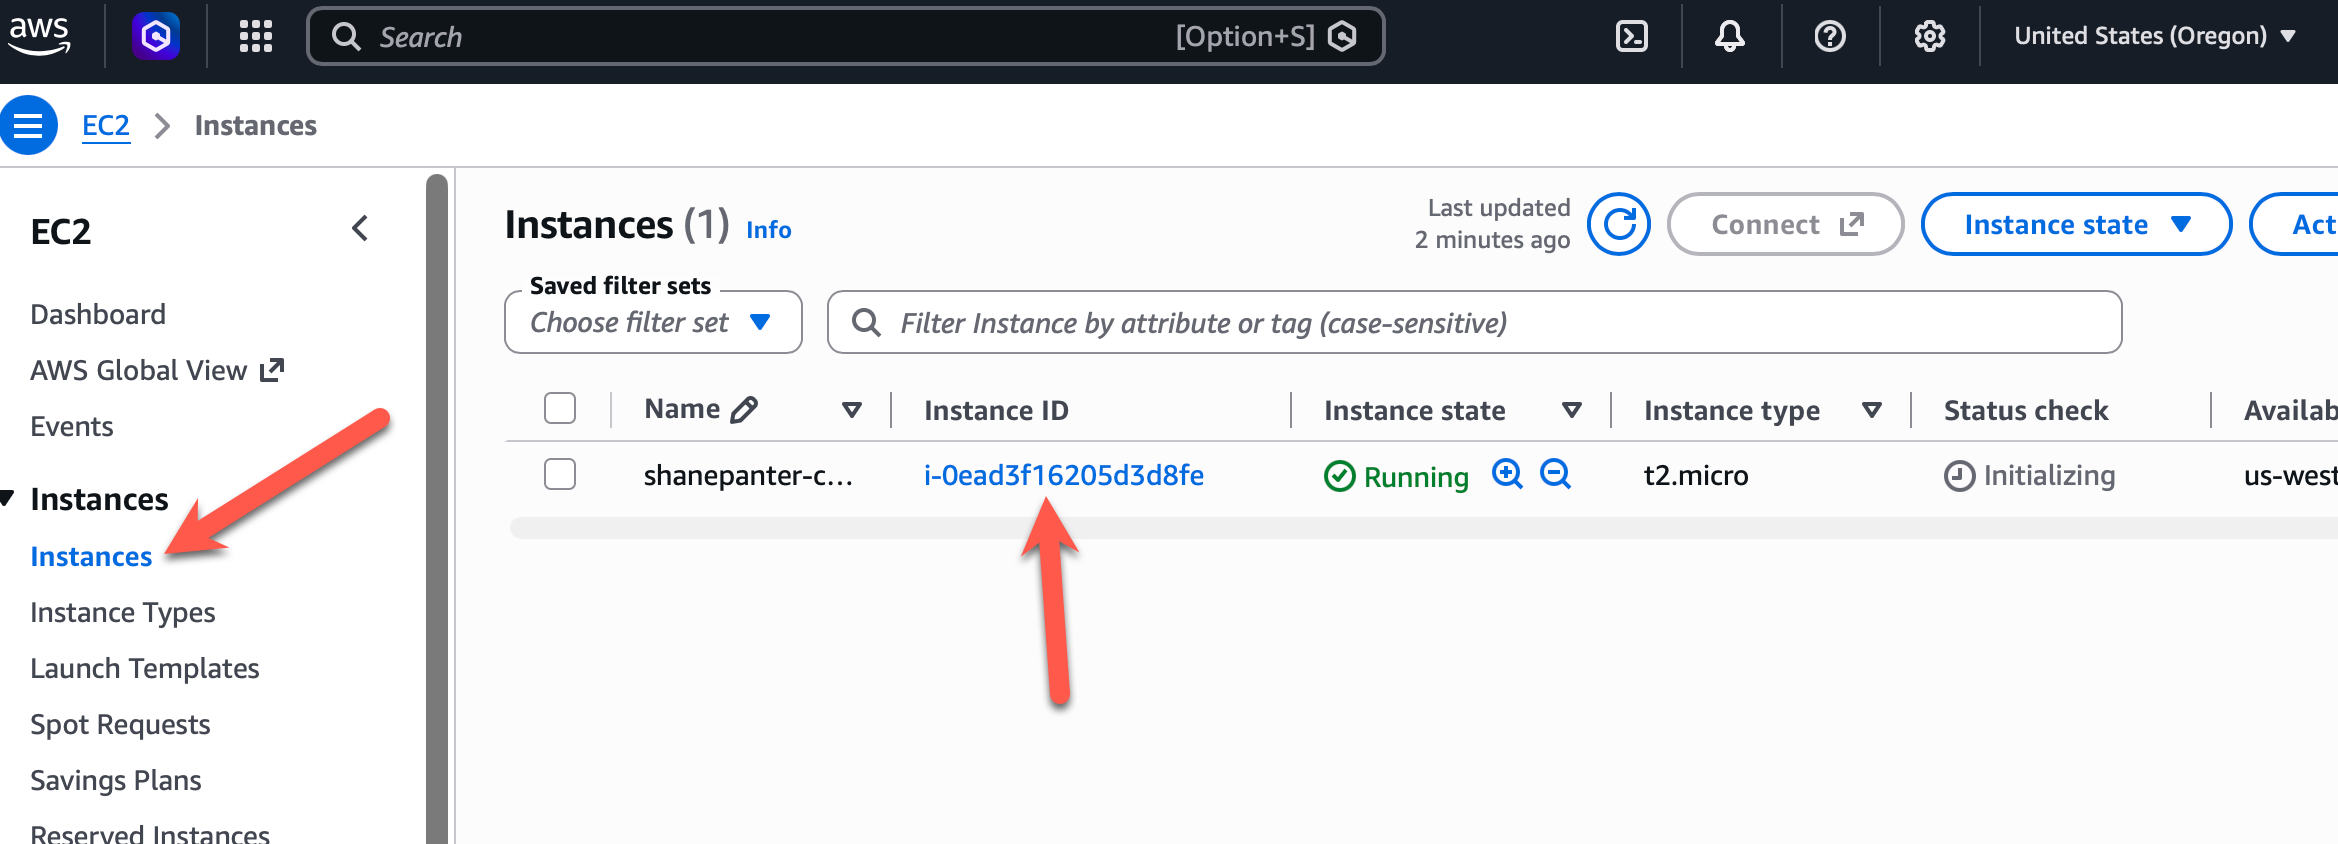
- Click on the link in the Instance ID column
- Then click on the "Connect" link as shown below
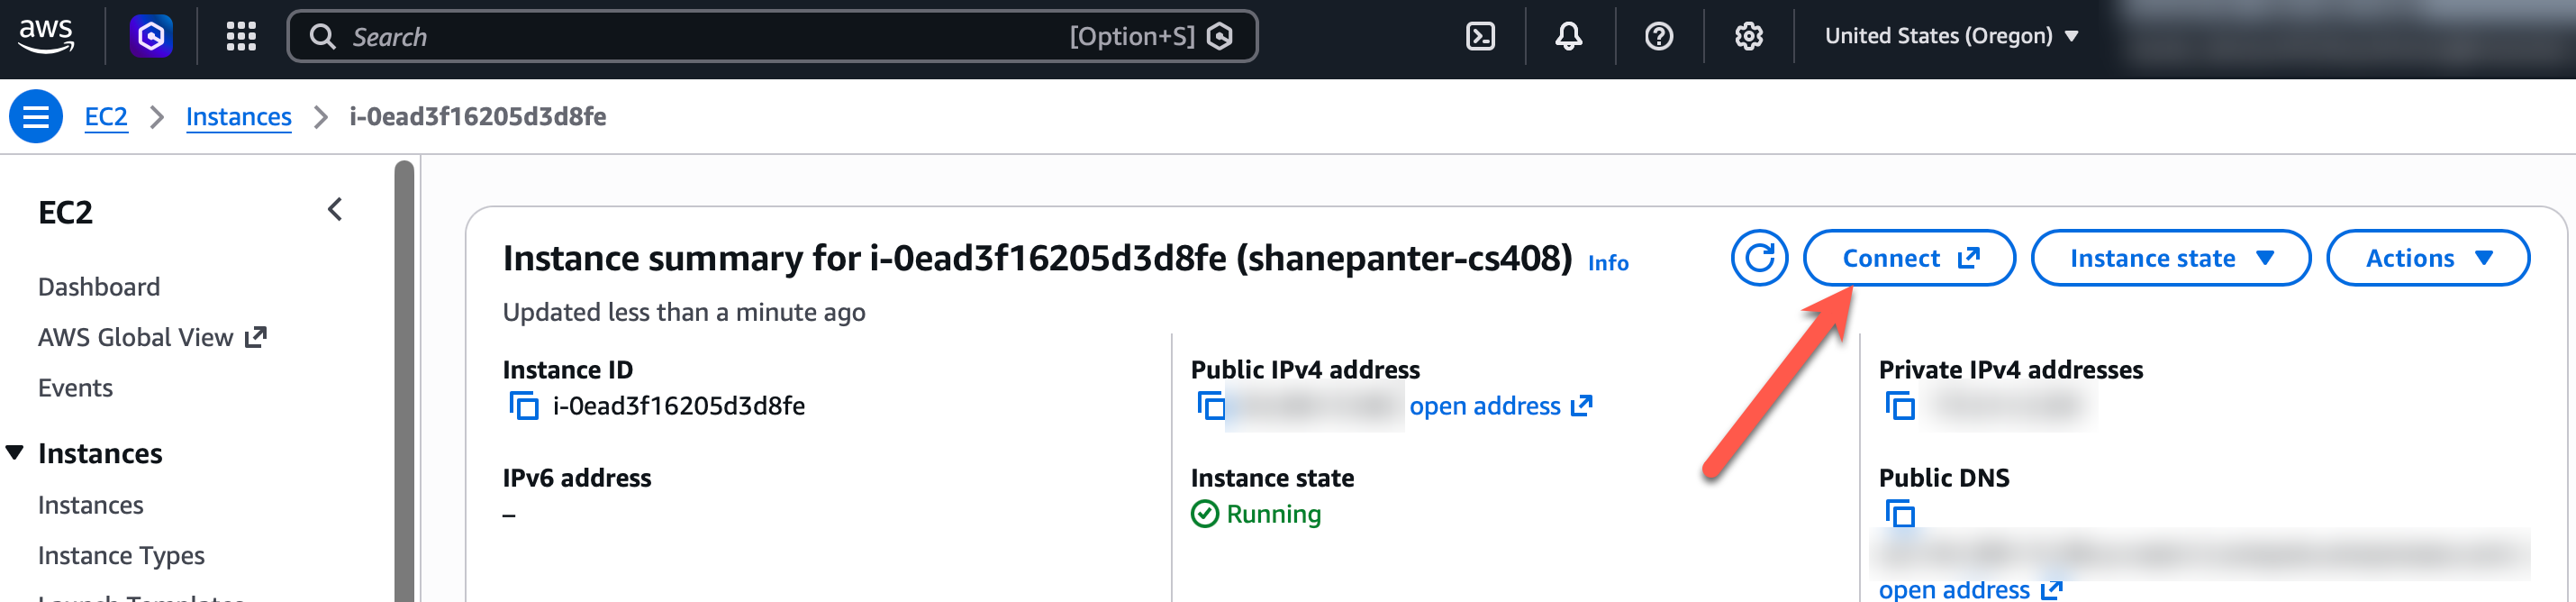
- Click on the In SSH client tab to get the instructions to ssh into your machine
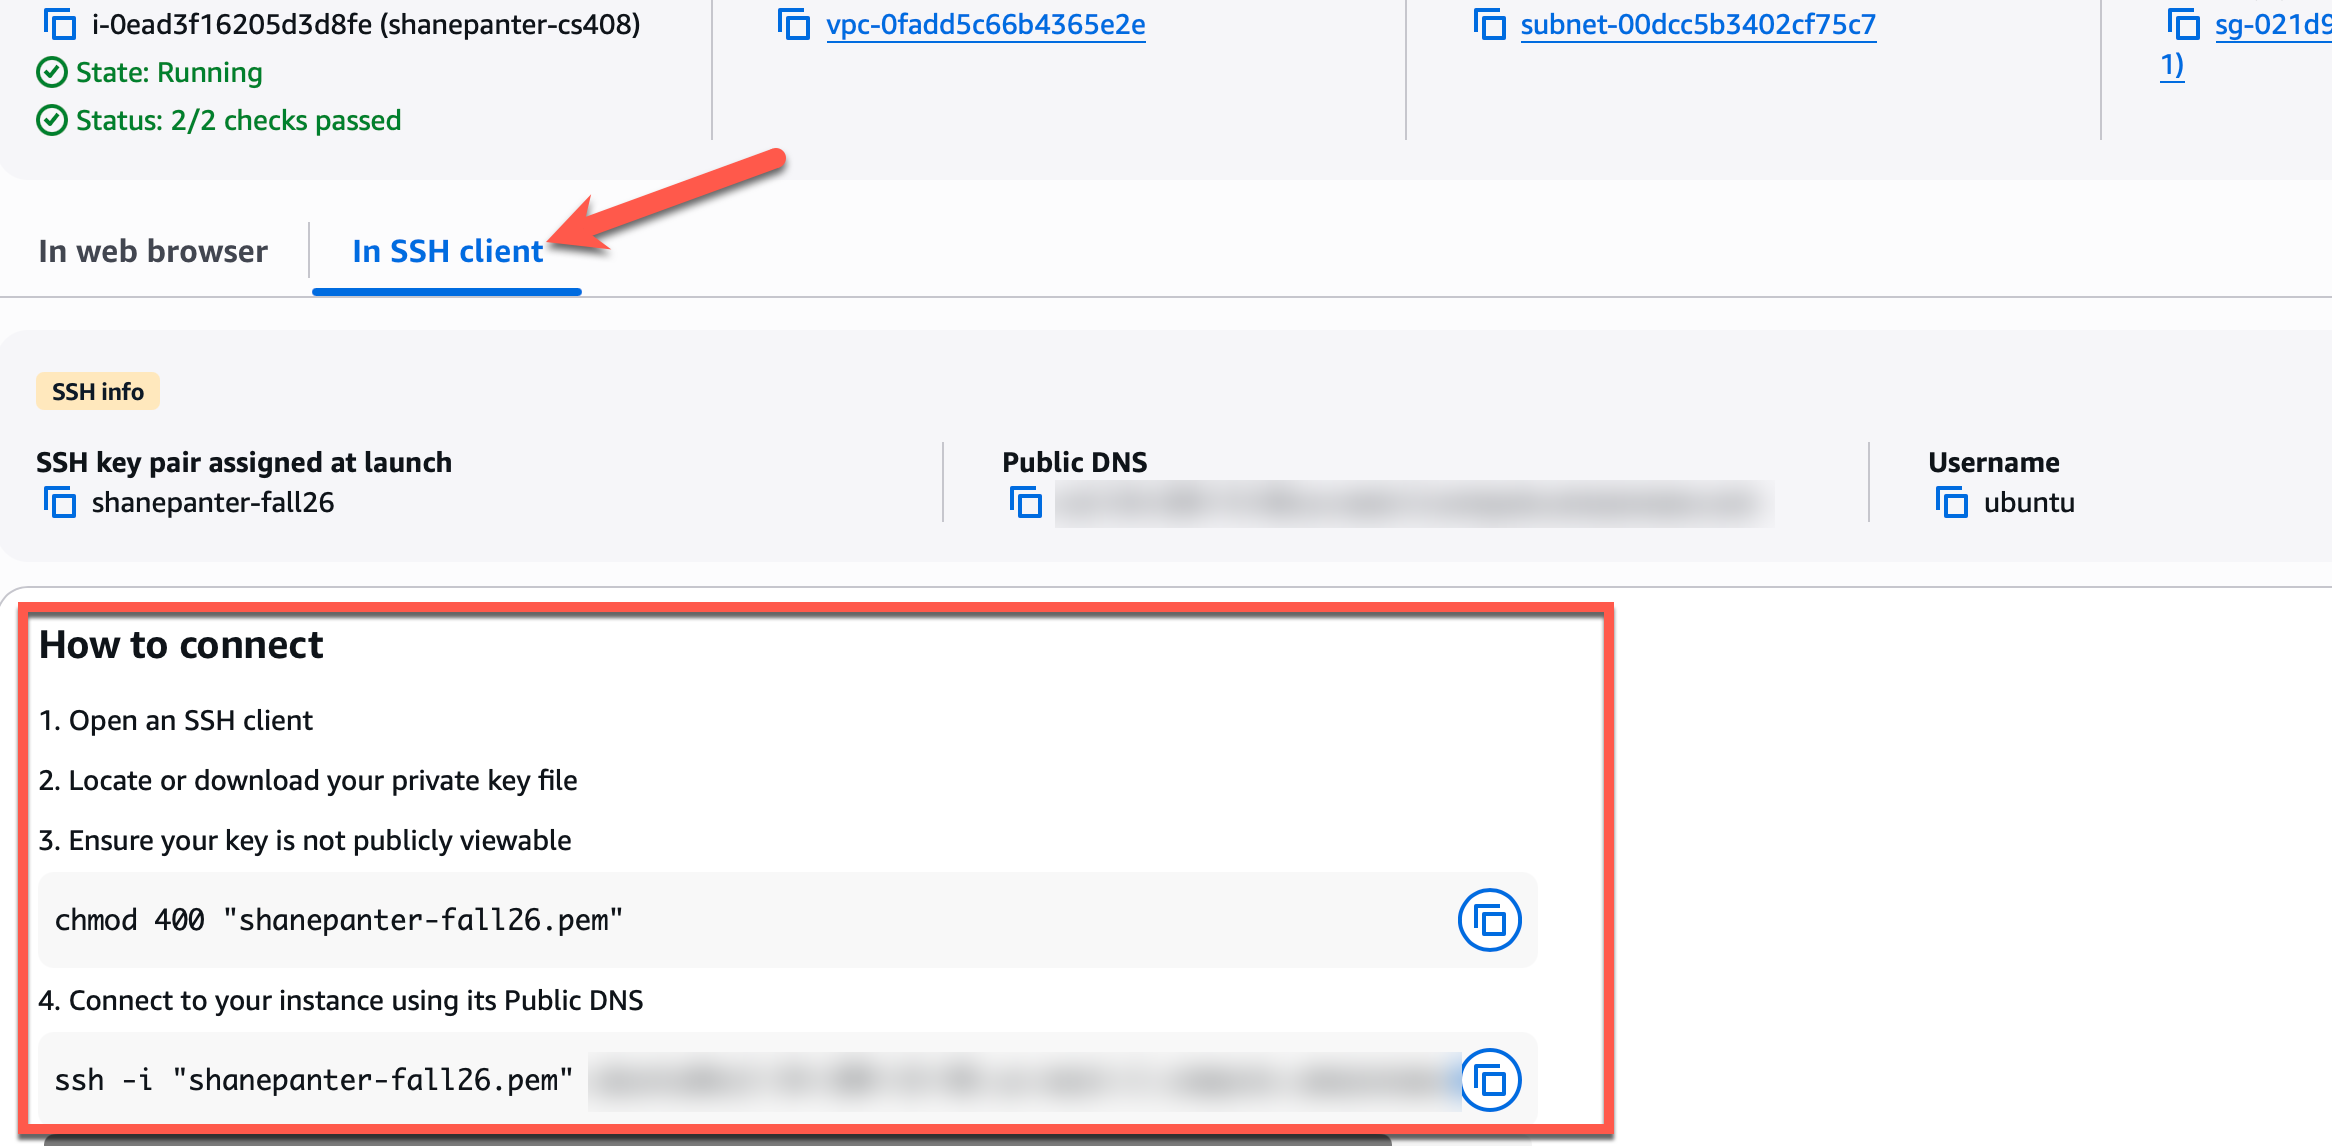
- Now open a terminal and go to the folder where you saved your key.
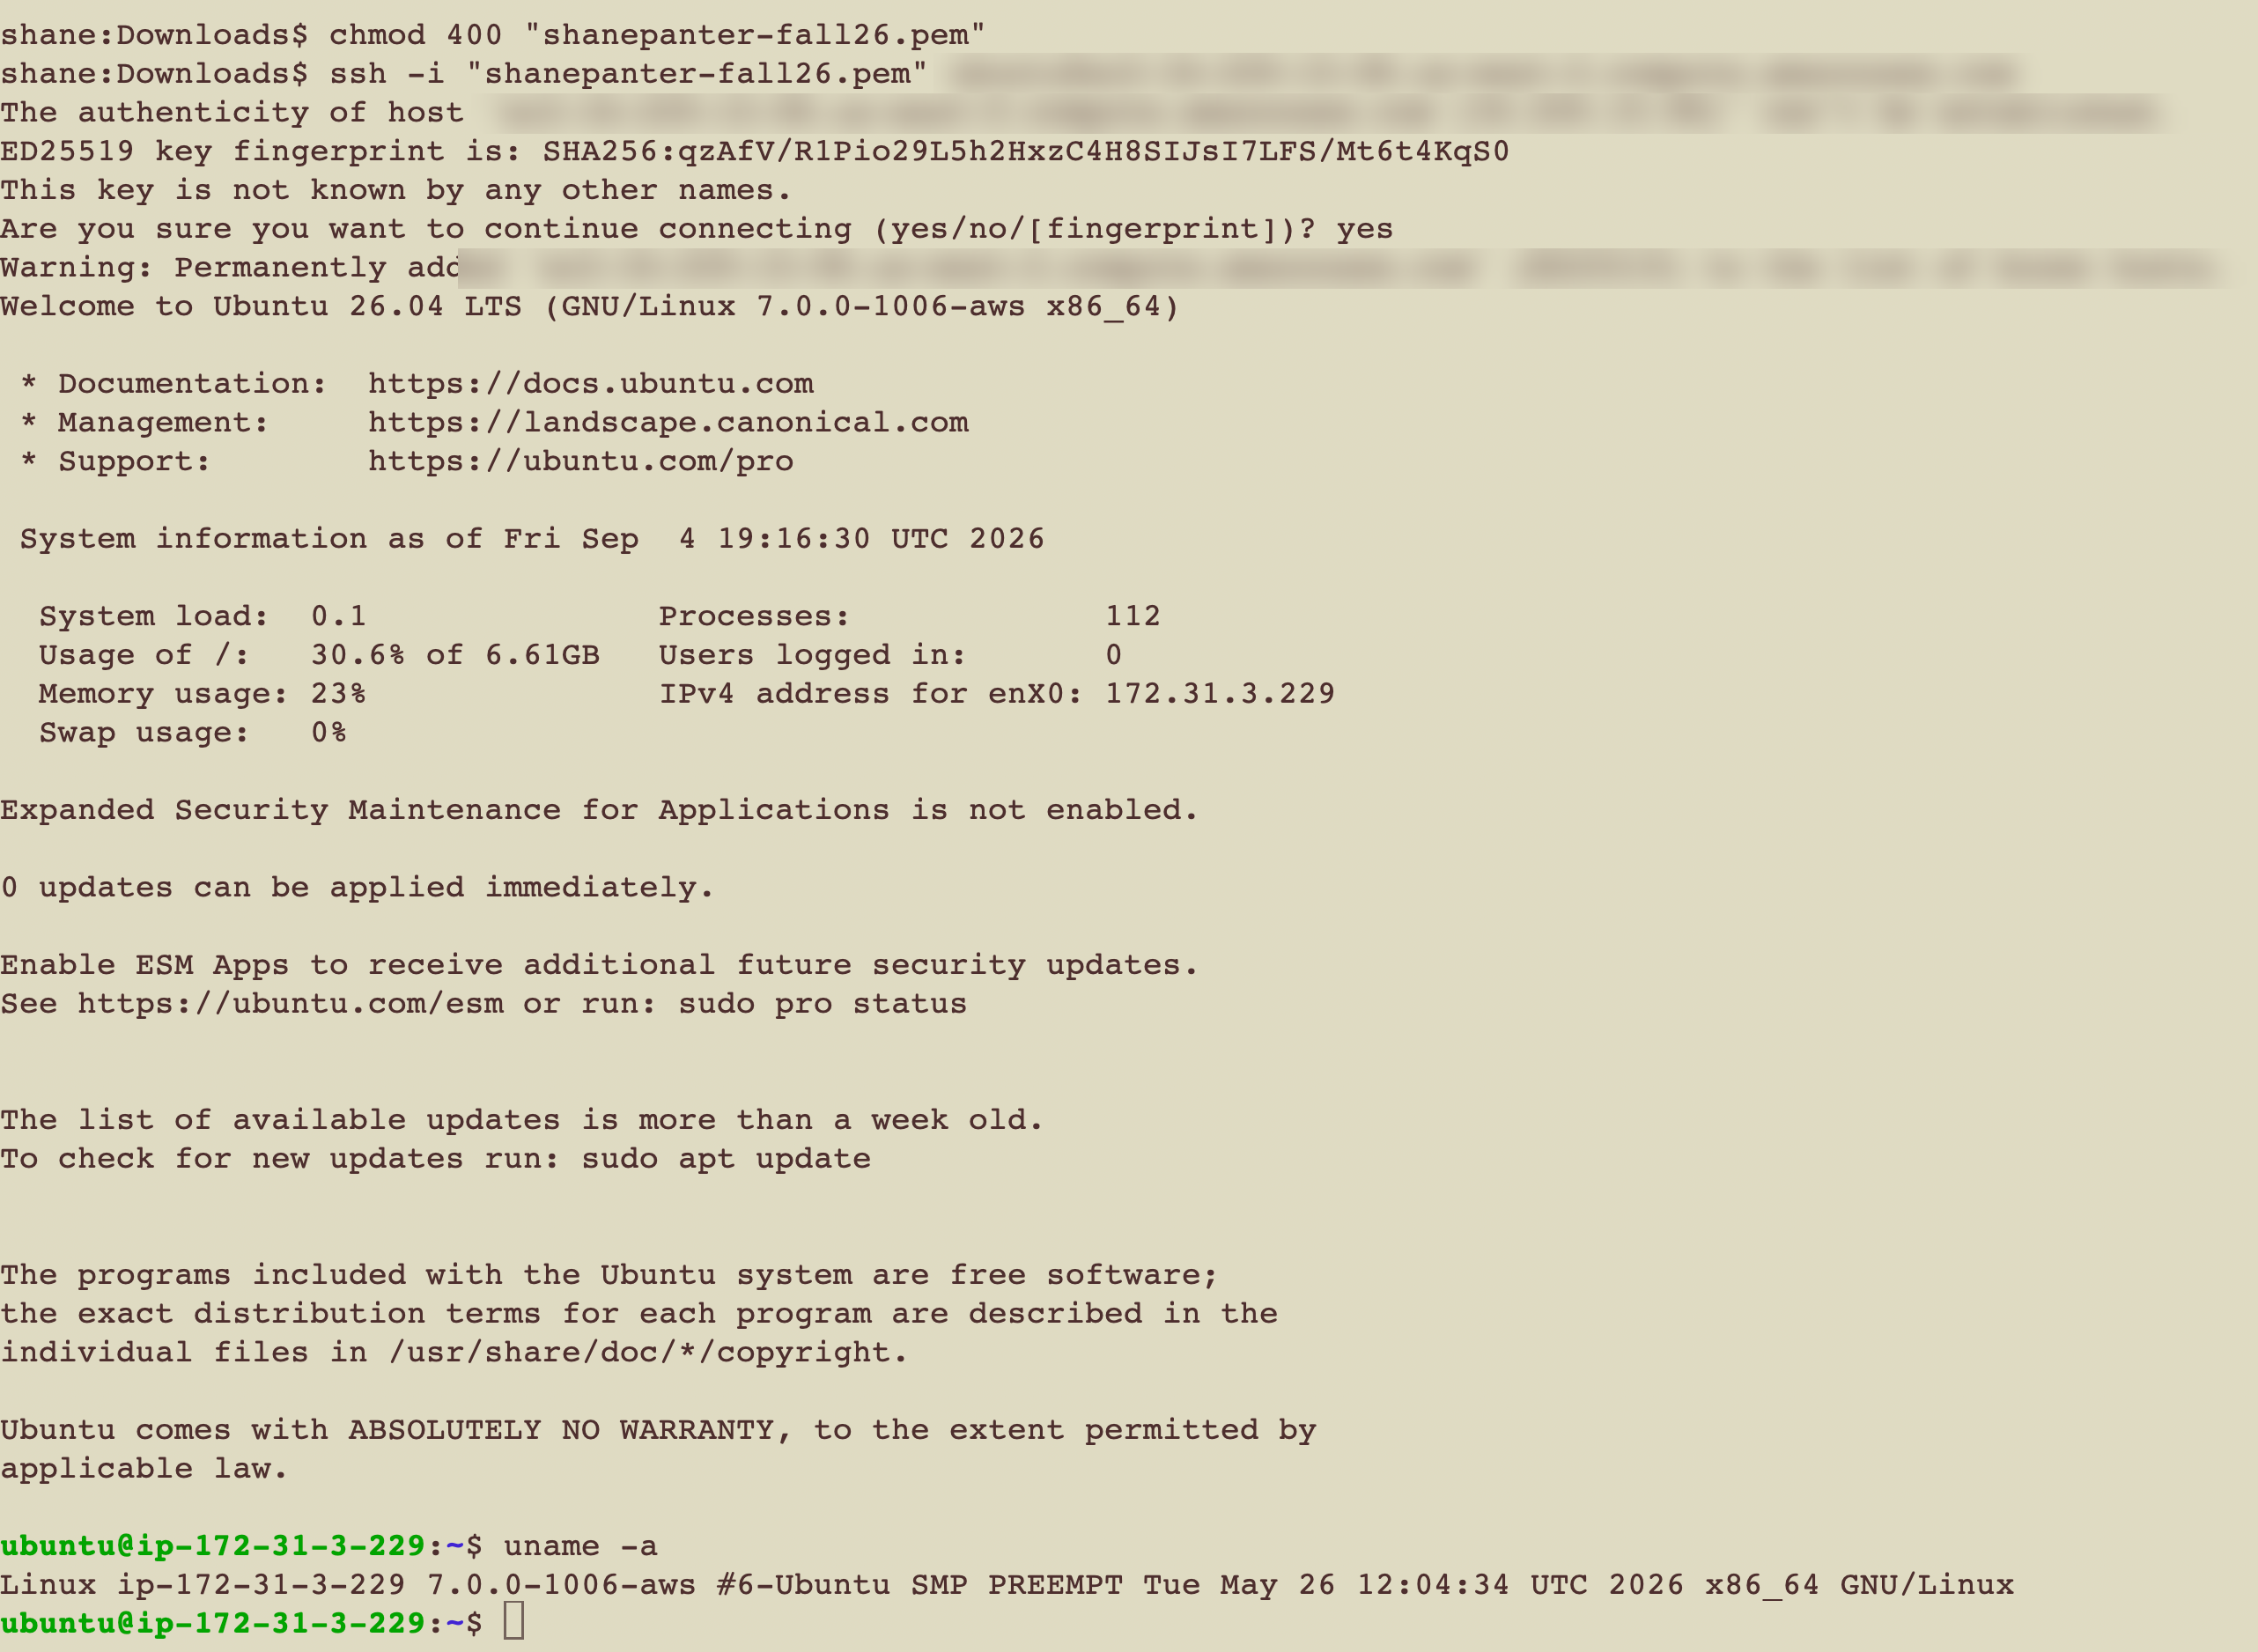
- Lock down the key first, or ssh refuses to use it with an "UNPROTECTED PRIVATE KEY FILE" error:
chmod 400 yourkey.pem(use your key's file name). You only need to do this once. On Windows, run this in WSL or Git Bash. - Then connect with the
sshcommand shown on the In SSH client tab. It looks likessh -i yourkey.pem ubuntu@<your public DNS or IP>. - Type yes when it asks you if you are sure you want to connect. Don't worry, it is safe!
- Run uname -a to confirm you are on your server!
- Lock down the key first, or ssh refuses to use it with an "UNPROTECTED PRIVATE KEY FILE" error:
Congrats! If you made it this far you have your own virtual machine on AWS to run your web app on. Your terminal should look like the screenshot below: the ubuntu@ip-... prompt and the output of uname -a. Take this screenshot now; it is what you submit.
Stopping your instance changes its public IP address; rebooting does not. If you stop it (for example to save credits) and start it again, your site moves to a new address, so update the spreadsheet with the new IP.
Task 3 - GitHub and the class spreadsheet
- Create a GitHub repository to host your application code. It must be public: I grade every checkpoint by cloning it, and if I cannot clone it, that checkpoint's own work earns 0.
- Before your first commit, add a
.gitignorethat excludes*.pemand.env, so your AWS key and any passwords can never be committed. The example app's.gitignoreis a good starting point. - Update the spreadsheet with your name and your GitHub repository URL. You add your public IP address in 07.02.
Submitting
Upload the screenshot from Task 2. Each item below is either done or not done, and earns all of its points or none:
| Item | Done when | Points |
|---|---|---|
| Task 2: Connected to your server | The screenshot shows the ubuntu@ip-... prompt of your EC2 server, which proves you logged in to AWS (Task 1), launched the VM, and connected with your key. | 20 |
| Task 2: uname -a on the server | The screenshot shows the output of uname -a, run on the server. | 5 |
| Task 3: Spreadsheet row | Your row in the class spreadsheet has your name and your GitHub repository URL. | 5 |
| Task 3: Repository is public | The repository URL in the spreadsheet opens without logging in to GitHub. | 10 |
| Task 3: .gitignore protects secrets | The repository has a .gitignore that excludes *.pem and .env. | 10 |
| Total | 50 |
Rubric
| n | description | points |
|---|---|---|
| 1 | Task 2: Connected to your server: The screenshot shows the ubuntu@ip-... prompt of your EC2 server, which proves you logged in to AWS (Task 1), launched the VM, and connected with your key. | 20 |
| 2 | Task 2: uname -a on the server: The screenshot shows the output of uname -a, run on the server. | 5 |
| 3 | Task 3: Spreadsheet row: Your row in the class spreadsheet has your name and your GitHub repository URL. | 5 |
| 4 | Task 3: Repository is public: The repository URL in the spreadsheet opens without logging in to GitHub. | 10 |
| 5 | Task 3: .gitignore protects secrets: The repository has a .gitignore that excludes *.pem and .env. | 10 |