Github Classroom Setup
This is an opinionated guide to using Github classrooms This guide extends the Official documentation with some recommendations on how to setup and configure everything. After you read through the official documentation you can come back to this guide to get everything configured.
If you haven’t signed up for a educational account visit the teacher portal first to get all signed up. While it is not required to get an educational account to use Github Classrooms it does give you access to a bunch of goodies that you would normally have to pay for so it is well worth the time to setup.
If you already have a Github pro account you don’t need to sign up for an educational account. A Github pro account already has access to everything you need.
Step 1 - Create an Organization
The first step is to create a new organization that is specific to the class in question. It is recommended that you don’t put multiple classes into one organization because any teaching assistants (TA) or graduate assistants (GA) must be added as owners of the organization so they can access the students submissions for grading or assisting students during office hours. Once a TA/GA is added as an owner they can see and access all of the repositories. It is possible, in upper division courses, to have a TA/GA who is grading for one class and also enrolled as a student in another.
Github has great documentation that will walk you through creating a new organization. Choose the free tier when given the choice in creating a new organization. During the setup, I recommend creating a new organization each semester that is specific to the class with the naming convention such as cs123-fall2023.
It is CRITICAL that you used your personal GitHub account! Do not use the BoiseState account because you can accidentally expose private repositories (solutions to exams, research, assignments, etc.) to your TA’s and GA’s.
Step 2 - Starter Code Repository
Some courses already have public starter code repository’s that should be listed in the syllabus. If you are teaching a class that already has starter code repository’s setup you can skip this step.
In order to use github classrooms you have to have a starter code repository. There are three options for starter code repositories that you can choose, each are detailed below. All starter code repositories must be setup as a template repository in order to use github classrooms. Refer to the github documentation on how to create a template repository. This repository must be set to public access.
The recommended format is the single lab format as it provides the most flexibility and enables you to use all of the features that github classrooms provides.
Single lab format (Recommended)
Each lab (or project) will be in its own repository. There are several advantages to this setup such as keeping the commit history specific to one project, minimizing merge conflicts because each project will be self contained, and using github pull requests to give feedback to students. Finally, this format makes it trivial to collect student samples for ABET purposes.
Students will generally only be pushing code after they accept the assignment. While it is still possible for students to get merge conflicts if they are moving between machines (desktop/laptop/lab) this model helps keep difficult merge conflicts lower because each lab starts with a fresh repository.
Empty repository
An empty repository is useful if you don’t want any details about your project publicly available on github or if you need students to complete the project entirely from scratch. In either case you can direct students to any supplemental material through another means such as canvas or email.
Multi lab format
This model supports labs (or projects) that may depend on each other. For example, you may have a lab where a student implements a data structure such as a linked list and then uses their data structure in a future lab. With the multi lab format it is easy for students to reference and link to previous assignments. This format also gives students additional practice with using Git which will be valuable when they graduate and start working in industry.
Be aware that there are a few disadvantages to using this format. Once such disadvantage is you can’t use the due data functionality provided by github classrooms and giving feedback with pull requests does not work without additional work from the instructor. Finally, students tend to run into more merge conflicts if the instructor or TA/GA is pushing grading feedback into the repo.
Step 3 - Create the Classroom
- Sign into Github classroom
- You can name your classroom whatever you want it does not impact any functionality. A suggested format is to name your classroom the same name as the organization that you will be using to host the repositories.
- Add in any TA’s or grad students that you want to your organization. You can add or remove TA’s later so you can skip this step on initial creation.
- Unfortunately the connect to canvas feature does not work for Boise State University so you will have to import your class roster manually. I have found that is is beneficial to wait until the first or second week of the semester to add students to the roster so you don’t have to deal with students adding late or dropping the class. Note that GitHub wants the class rosters in CSV or one email per line format.
Step 4 - Create an Assignment
- Create an assignment using the Github Classroom web interface. You can designate the assignment as a group assignment or individual assignment. Github classroom does not have a mechanism to automatically divide students into teams, students will need to know the name of their team before accepting the assignment. You can create teams with whatever method you prefer, I use canvas to automatically create teams as this also sets up the grade book correctly. It is recommended that you do not give your students admin access unless you absolutely know you need that feature.
- I typically name the assignment something generic like p1 or lab1. That way it makes it easier to use and script the command line downloader.
- Set the template repository that you created previously.
Don’t use the supported editor feature as it seems to break for some students.
- Add in any auto-grading that you want. These will be run using Github actions.
- (Optional) Setup the assignment to use github pull requests for student feedback.
- (Optional) Create a canvas assignment using the Github Classroom Template and update the link in the template with the link generated by github classrooms.
While VSCode is not required to use Github or Github Classrooms it has phenomenal integration with Github that makes it trivial to work with repositories. VSCode is the recommended way for students to interact with Github.
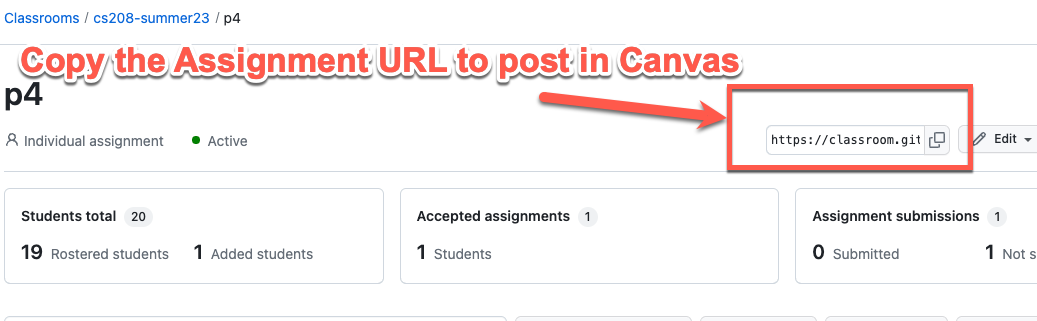
Copy Assignment URL
Copy the Assignment URL as shown below and post the URL to your canvas site so students can access the assignment.
Admin access
Generally speaking students do not need admin access to their own repositories. Here are a few cases where they do need admin access.
- You want students to be able to add other parties to their repo but don’t want those individuals to be on your class roster. This situation can come up if your students need to collaborate with another department or external company such as in a senior design or capstone class.
- You want students to be able to create a github project page to showcase their work.
- You are doing a project that requires student to author their own github actions
Step 5: Download student submissions
- Install GitHub CLI by following the instructions here.
- Authenticate GitHub CLI by running the following command in your terminal:bash
gh auth login - Install the official GitHub Classroom CLI tool by running the following command:bash
gh extension install github/gh-classroom - Navigate to the directory where you want to download student submissions.
- The official docs detail all the options for downloading student submissions using the CLI tool.
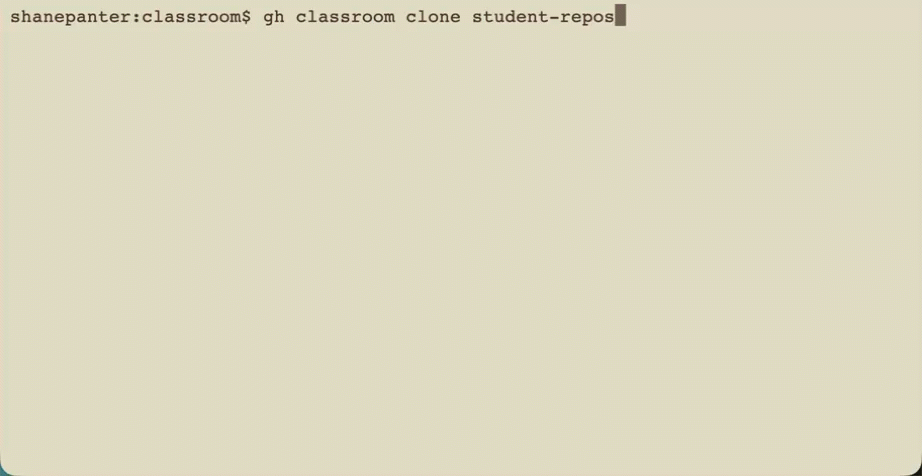
- To download all submissions for a specific assignment, run the following command:bash
gh classroom clone student-repos
Renaming directories (optional)
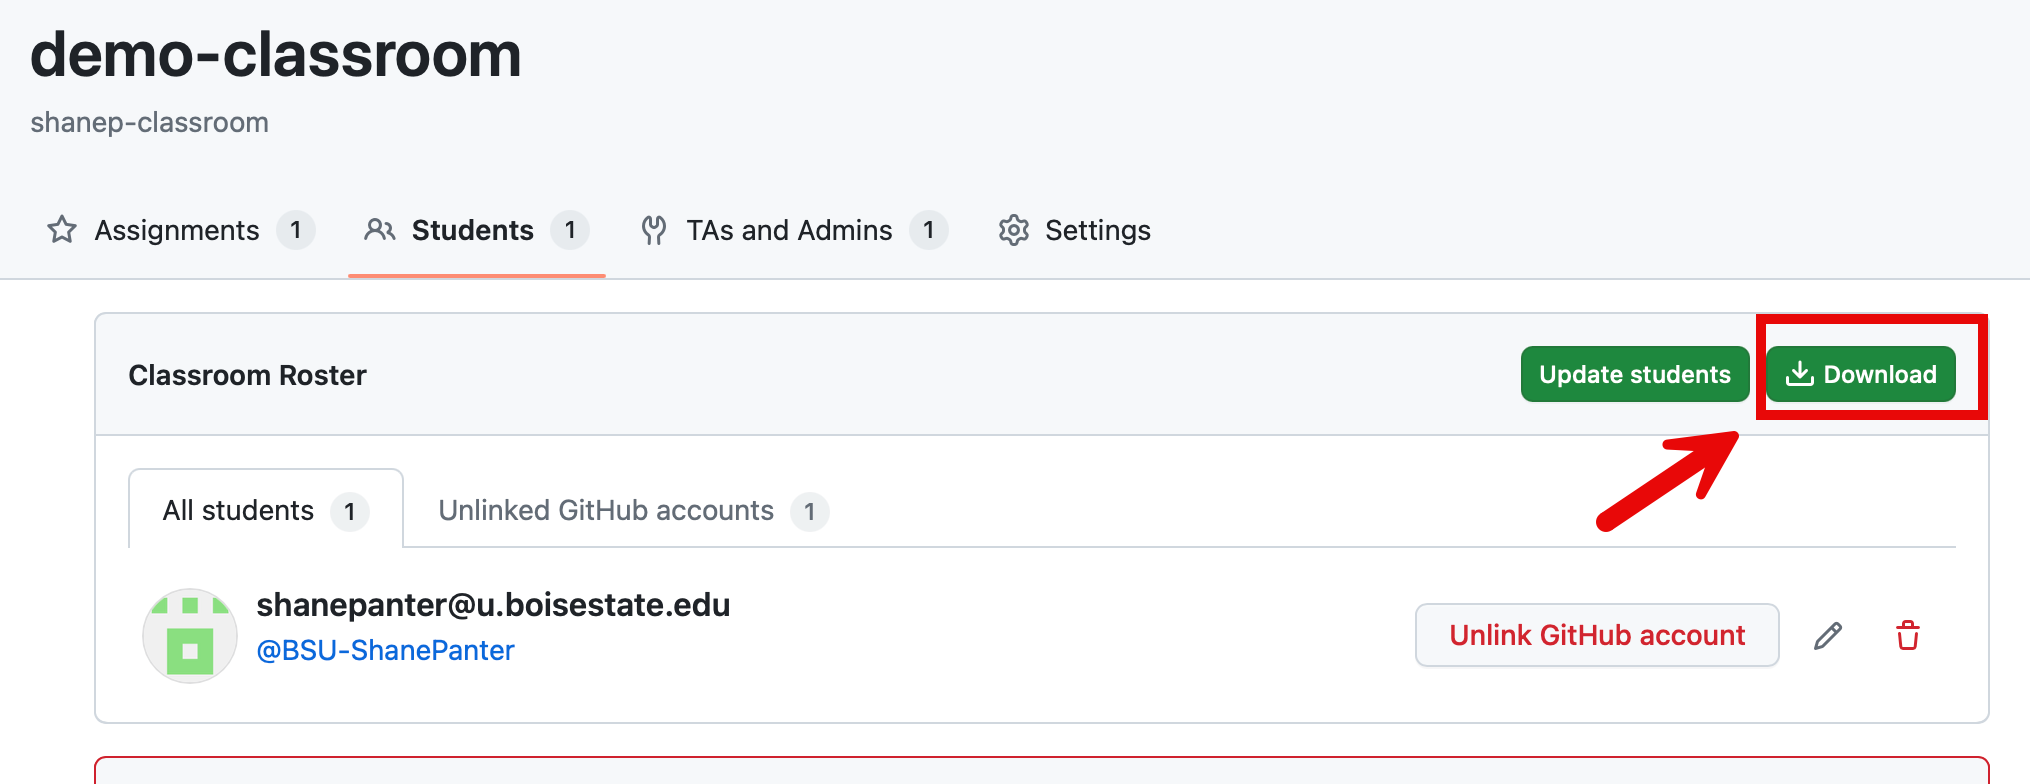
Get the classroom roster from the GitHub classroom web interface by going to the classroom and clicking on the "Students" tab. Download the roster as a CSV file and put it in the same directory where you downloaded the student submissions.
The github cli names the directories with the assignment name followed by the student's GitHub username. For easier scripting you can use this script to rename all the directories to be their university email.
- Get the student submissions:
shanepanter:classroom$ gh classroom clone student-repos
? Select a classroom: demo-classroom
? Select an assignment: p1
Creating directory:  /Users/shanepanter/classroom/p1-submissions
Cloning into: /Users/shanepanter/classroom/p1-submissions/p1-BSU-ShanePanter
Cloned 1 repos.
Here is what your directory should look like before running the script:
shanepanter:classroom$ tree
.
├── classroom_roster.csv
├── p1-submissions
│   └── p1-BSU-ShanePanter
│       ├── hello.c
│       ├── LICENSE
│       ├── README.md
│       └── test-ssh-stuff
└── rename-repos.sh

3 directories, 6 files- Run the rename script the assignment name is the same as gh classroom used when downloading the repos. In this example the assignment name is
p1.:
Run the script like this:
./rename-repos.sh classroom_roster.csv p1- After running the script the directories will be renamed to their university email:
shanepanter:classroom$ ./rename-repos.sh classroom_roster.csv p1
✔ Successfully renamed p1-submissions/p1-BSU-ShanePanter to p1-submissions/shanepanter@u.boisestate.edu
shanepanter:classroom$ tree
.
├── classroom_roster.csv
├── p1-submissions
│   └── shanepanter@u.boisestate.edu
│       ├── hello.c
│       ├── LICENSE
│       ├── README.md
│       └── test-ssh-stuff
└── rename-repos.sh

3 directories, 6 files
Legacy Downloading
Before the official CLI tool was released we had our own method for downloading student submissions called ghclass. While it is recommended to use the official CLI tool above, if you want to use the legacy tool you can find it here: ghclass.